ADOpy for Scene2Model
ADOpy for Scene2Model is a prototype for creating the Domain Vocabulary (saved in the Domain-specific library) of Scene2Model by writing Python code. This includes writing functionality in Python, which can than be triggered from the Scene2Model modelling tool. This Python code can be used to interact with the Cyber-physical Systems used in OMiLAB' Digital Innovation Library, but it also works independent from physical objects.
To use ADOpy for Scene2Model (incl. the CPSs), you need the following components:
- Scene2Model modelling installed
- ADOpy for Scene2Model extensions available
- Access to OMiLAB's Jupyter Notebook
- Prepared CPSs
Preparation
Access OMiLAB's Jupyter Notebook
OMiLAB'S Jupyter Notebook can be accessed via: ml.omilab.org
For logging in, oyu need a OMiLAB Single-Sign On account and access to OMiLAB's GitLab instance (code.omilab.org).
Create a OMiLAB Single-Sign On account, by:
- Opening the OMiLB Community Page: community.omilab.org
- Click on
Login to join the community - Sign in with a
social media accountor click theRegisterbutton
Get access to code.omilab.org:
- Open OMiLAB's GitLab: code.omilab.org
- Click
OMiLAB Single-Sign On - Login with your account
- Your GitLab access needs to be confirmed by the administrators. This can take some days.
After your code.omilab.org account is confirmed, you can access ml.omilab.org, by
- Open OMiLAB's Jupyter: ml.omilab.org
- Click
Sign in with GitLab
Add ADOpy to your Scene2Model Modelling Tool
To use ADOpy for Scene2Model in your installation of the modelling tool, you have to activate and install the extension.
You can find the description on how to install the extension at Activate Extensions
Configure ADOpy for Scene2Model in the Modelling Tool
A prerequisite for the configuration is, that you access OMiLAB's Jupyter instance (ml.omilab.org). To login, open the webpage click on Sign in with GitLab and login in (you can use the OMiLAB Single-Sign On account).
Get the information from ml.omilab.org
To get the needed information from ml.omilab.org that you must enter in the Scene2Model modelling tool, open the web interface and login.
In the Jupyter interface:
- Click
File - Click
Hub Control Panel - Copy your username
- Your username is written in the top right corner of the interface of the Hub Control Panel
- Copy the name for later use in the Scene2Model modelling tool configuration
- Create an access token
- In the
Hub Control Panel - Click on
Token - Fill in a note that lets you identify the token (e.g., adopy_for_s2m)
- Choose when or if the token should expire (e.g., Never)
- Let the permissions list empty
- Click
Request new API token - Copy paste the shown token temporary in a text editor, as it cannot be shown again, once the window is closed
- In the
 Interface of the Jupyter's Hub Control Panel
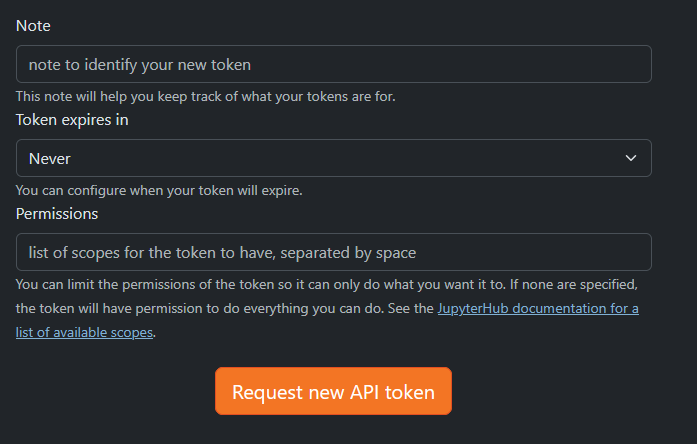 Provide information to create an access token for Jupyter
Modelling Tool Configuration
After installing the plugin, the configured information will be queried in the user interface. The configuration can later be adapted as well.
For querying the information, multiple windows will be shown:
- Provide url
- the base URL is shown in the text field
- You must enter your username form OMiLAB's Jupyter (ml.omilab.org), by replacing
[username]with your own. At the end the url should look similar to the following example, only with your username instead of muckc
- Provide the token
- Enter the access token, that you have created on Jupyter (see Get the information from ml.omilab.org)
- If available available projects on your Jupyter account are shown. If one is available you can choose it, if not than you can create a new one.
- Finally you are asked if Scene2Model should install itself in a way, so that you can open the tool with from the Jupyter web interface.
- This works only on Windows and is optional
You can adapt the configuration by
- Click
System tools - Click
Edit internal configuration - Click
adopy-for-s2m.properties - Click
Ok - Adapt the information in the text editor
- Click
Apply - Click
System tools - Click
Reload application
Create your Design Vocabulary
This section describes how you can create your Design Vocabulary with Python code and than import it as a Domain-specific Library in the Scene2Model modelling tool.
Basic Jupyter Project Structure
To use ADOpy for Scene2Model, a project in the form of a folder must be added to your account. Create a top level folder in your user account. And upload/create the following mandatory and optional files. Entries which are marked with created are automatically created through the usage of the project.
You can also create the project structure out of your Scene2Model modelling tool (see Initialise a Project from Your Modelling Tool)
Project Structure
- asc.domain (created)
- folder that is automatically created
- contains the needed scripts to execute functionality in the Scene2Model modelling tool
- config (optional)
- folder that contains the configuration to connect to CPS in the experimentation environment
- to use, a
config.yamlmust be contained with the needed configuration parameter (see Experiment Execution)
- _jupyter_helper_functions.ipynb (optional)
- file to help working with Jupyter
- if the code is executed the asc.domain folder and all the output files are deleted, which can be used for a clean up
- you can download the file here
- create_s2m_metamodel.ipynb
- this is the main file, containing the definition of the design vocabulary
- more information about the structure and what can be done can be found below
- create_s2m_metamodel.json (created)
- created file, that contains the information of the design vocabulary so that it can be imported into the Scene2Model modelling tool
- json structure is based on the Metamodel@Runtime(MM@RT) project
- exec-create_s2m_metamodel.ipynb (created)
- created code that creates the create_s2m_metamodel.json file for importing the design vocabulary in the Scene2Model modelling tool
- export-create_s2m_metamodel.ipynb (created)
- this file is created to execute functionality trigged by the Scene2Model modelling tool
- out.%id%.json (created)
- these files (%id% replaced with an random identifier) are created containing the output from executing behaviour from the Scene2Model modelling tool
Initialise a Project from Your Modelling Tool
After you have configured your Scene2Model modelling tool for ADOpy for Scene2Model, you can create a new project from your modelling tool.
In the Scene2Model modelling tool:
- Click
Update project path form Jupyter - Choose
<New Project>and confirm - Provide a name and confirm
You can now find a new top-level folder in your Jupyter account, containing the main file you need for creating a project.
ADOpy Design Vocabulary - General Structure
The ADOp for Scene2Model works by creating a specific class hierarchy in Python, that can than transformed to a Metamodel@Runtime(MM@RT) JSON, which can then be imported into Scene2Model.The Python class hierarchy consists of three levels:
- 1st level - the root class: Consists of the class ModellingClass.This is the root class, from which the second level must inherit.It is available in the JupyterLab environment and offers basic functionality to generate the MM@RT JSON.
- 2nd level - class level: The 2nd level consists of the classes to be available in Scene2Model (will be translated to ADOxx classes).They must inherit from the ModellingClass.
- 3rd level - type level: Implemented as subclasses of the 2nd level.They must inherit from a 2nd level class.These classes must posses two attributes:
- image: link to a publicly available picture in .png or .jpg format.
- recognition_id: the identifier for the used recognition, e.g. a TagID or a label from the image recognition.
To define relation classes that should be available in Scene2Model create a Python class that inherits from RelationClass. They must provide a class attribute source and target that specifies the allowed source and target class (which inherits from ModellingClass) as a type annotation.
To define additional modeltypes to be available in Scene2Model define a Python class that inherits from Modeltype.
They must provide a class attribute include_classes that specifies which relation-/classes should be available in the model type through a list.
Attributes and Behaviour
Attributes for the objects and relations in Scene2Model are defined as class attributes of the Python class. Behaviour is defined through methods of the Python class.
For an attribute to be usable in Scene2Model you must specify an instance of the Attribute class as its value. The constructor for Attribute requires as a first parameter the ADOxx type using one of the values available in AttributeType.
For example, creating an integer and a string attribute:
lock_state = Attribute(AttributeType.INTEGER)state = Attribute(AttributeType.STRING)
Currently the following AttributeType are available:
- INTEGER
- STRING
- PROGRAMCALL
To add behaviour the methods of a class in Python must register one of the s2m.Trigger decorators, like @s2m.Trigger.BUTTON.register() or @s2m.Trigger.NEAR.register().
For example, here is a code snippet defining 2 methods of classes:
class Vehicle(ModellingClass):
    #this class cannot be instantiated as it is a direct child of ModellingClass''

    lock_state = Attribute(AttributeType.INTEGER)

    @s2m.Trigger.BUTTON.register()
    def lock(self):
        self.lock_state=1


class Technical_Equipment(ModellingClass):
    #this class cannot be instantiated as it is a direct child of ModellingClass''

    state = Attribute(AttributeType.STRING)

    @s2m.Trigger.NEAR.register()
    def prepare_for_work(self, target:Human):
        self.state="ready"
Currently the following triggers are available:
- BUTTON: creates a button in a notebook of the objects, which can be triggered with a click
- MENU_ITEM: adds a menu entry to the Scene2Model modelling tool
- CREATE: the behaviour is executed when an object is created
- NEAR: the behaviour is executed if two objects in the Scene2Model modelling tool are overlapping
The defined attributes and behaviours can be accessed in the Scene2Model modelling tool, when opening the notebook of an object (double-click) and opening the corresponding tab. Based on the definitions in the ADOpy code, the tabs will be added in the format %name%-attributes% and %name%-behaviour.
Visualisation of the Design Vocabulary
The visualisation of object in the Scene2Model modelling tools works currently only with pictures provided via links.
IMPORTANT: The links must be publicly available and end with a file ending like png or jpeg. If query parameters come after file ending, the pictures cannot be visualised in the Scene2Model modelling tool.
To upload pictures to get an URL you can use OMiLAB's GitLab.
- Open code.omilab.org in your browser and login
- Open a project or create a new one
- The project must be set to public to allow access to the pictures
- Choose the folder where you want to upload your picture and open it in the graphical web UI
- Upload a file
- Click on the + symbol
- Choose
Upload file - Choose your file
- confirm
- Get the link
- Open the picture in the graphical UI of code.omilab.org
- Copy the link from the browser and paste it to the
imageattribute of the class in the Design Vocabulary - replace the blob part of the link with raw
- make sure that the link ends with a picture ending, like png or jpg
Using ADOpy for Scene2Model (Modelling Tool)
This section introduces how the ADOpy for Scene2Model can be used in the modelling tool.
Changing the ADOpy Project used in the Scene2Model Tool
- Click
Library Management - Click
Update project path from Jupyter (experimental) - Choose one or create a new one
- You can choose one of the existing projects or create a new one from the Scene2Model modelling tool
Import the Design Vocabulary
After installing and configuring the plugin (see configuration) and setting the project (see changing the ADOpy project)
In the Scene2Model modelling tool:
- Click
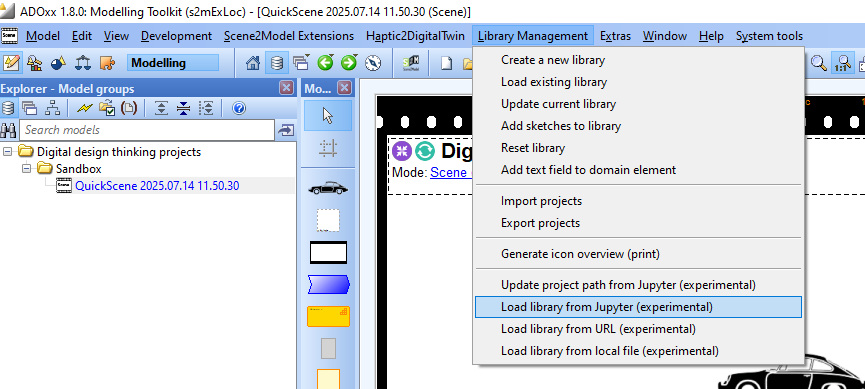
Library Management - Click
Load library from Jupyter (experimental)
Controlling the CPSs
The elements defined in the Design Vocabulary can be connected to Cyber-Physical Systems (CPS) from OMiLAB's Digital Innovation Environment.
To do so, Python code must be added to the ADOpy for Scene2model code. To use the config/config.yml file must be available in the project on Jupyter and it must contain the needed parameters for the CPS that should be used.
Three CPS are available:
- Custom Environments: Sensors and actuators connected to an Arduino
- Arduino: Arduino Uno Wifi rev2
- Sensors:
- light
- button
- humidity
- temperature
- rfid
- Actuators:
- LED green
- LED red
- Servo
- mBot: robot car from Makeblock
- Sensors:
- linefollower
- ultrasonig
- light
- actuator
- drive
- make sound (honk)
- led
- led matrix
- Sensors:
- dobot: robot arm with suction cup
- Sensors:
- current position of the robot arm in (x,y,z)
- Actuators:
- move to position (x,y,z)
- reset (move back to home position)
- suction cup
- Sensors:
The following code imports the clients to connect to the CPS.
from config import CONFIG
from custom import CustomEnvironmentRestApiClient
from mbot import MBotRestApiClient
from dobot import DobotRestApiClient
The first line imports the config/config.yml file and reads the defined parameters. The other import the clients.
Example of code snippets for using the mBot CPS client in ADOpy for Scene2Model:
class Vehicle(ModellingClass):
    # The `lock_state` attribute will be available in the notebook within Scene2Model.
    lock_state = Attribute(AttributeType.INTEGER)

    # Object that represents the Cyber-Physical System of a specific "vehicle".
    cps = MBotRestApiClient(CONFIG["mbot4"]) # 'mbot4' is the key defined in the config.yml

    # This method will be added as button to the notebook in Scene2Model.
    @s2m.Trigger.BUTTON.register()
    def lock(self):
        self.lock_state = 1
        self.cps.set_led(255,0,0) # setting the led of the cps
        self.cps.honk()
        self.cps.set_screen("no")
        return self.lock_state
Example of code snippets for using the dobot CPS client in ADOpy for Scene2Model:
class Technical_Equipment(ModellingClass):
    pass

class Robot_Arm(Technical_Equipment):
    image = "https://scene2model.omilab.org/files/s2m-libraries/s2m-manufacturing-library/vehicle/235.Crane.png" # required
    recognition_id = 235 # required

    state = Attribute(AttributeType.STRING)

    # Object that represents the Cyber-Physical System
    cps=DobotRestApiClient(CONFIG["dobot1"]) # 'dobot1' is the key defined in the config.yml

    # An event will be triggered when the button is clicked in the notebook
    @s2m.Trigger.BUTTON.register()
    def prepare_for_work(self):
        if self.cps.reset(): # calling the cps functionality
            return "Reset successful"
        else:
            return "Reset failed"
Example of code snippets for using the Custom Environment CPS client in ADOpy for Scene2Model:
class Infrastructure(ModellingClass):
    # Object that represents the traffic light
    cps = CustomEnvironmentRestApiClient(CONFIG["arduino4"]) # 'arduino4' is the key defined in the config.yml


class Traffic_Light(Infrastructure):
    image = "https://scene2model.omilab.org/files/s2m-libraries/s2m-citizen-library/locations_furniture/68.Traffic_Light.png" # required
    recognition_id = 0 # required

    current_colour = Attribute(AttributeType.STRING)
    @s2m.Trigger.BUTTON.register()
    def turn_green(self):
        self.current_colour = "green"
        self.cps.send_lamp_red(False) #calling cps functionality
        self.cps.send_lamp_green(True) #calling cps functionality
        return self.current_colour
Operations of the CPS Clients
The CPS clients offer the following methods that can be used in ADOpy for Scene2Model
mBot
- set_speed(speed):
- sets the speed of the mBot to the given parameter (recommended 80)
- get_speed():
- returns the currently set speed
- get_line_follower():
- returns the current value of the line_follower sensor
- get_ultrasonic_sensor():
- returns the current value of the ultrasonic sensor
- get_light_sensor():
- returns the current value of the light sensor
- get_drive():
- gets the last value that was send to the drive actuator
- drive(direction):
- let the mBot drive based on one of the following directions
- straight: starting on a black line, follow it till white is reached
- right: staring on white, turn right till a black line is reached
- left: starting on white, turn left till a black line is reached
- jump: starting on white, drive straight till a black line is reached
- let the mBot drive based on one of the following directions
- get_honk():
- return the current state (ON or OFF) of the honk actuator
- honk():
- let the mBot honk (make a specific noise)
- at the end the state of honk should be OFF
- get_led():
- return the current state of the led, in a dict containing the red, blue and green value
- set_led(red,green,blue):
- sets the LEDs on the mBot to the color, provided through the corresponding values for red, green and blue (RGB encoding)
- the values must be provided as an integer between 0 and 250
- send red=0, green=0 and blue=0 turns of the LED
- get_screen():
- get the current value of the LED matrix
- set_screen(text):
- sets the LED matrix to the current text
- works with numbers and short texts
- clean_screen():
- removes the writing from the LED matrix
- to_dict():
- returns a dict with the current values of the CPS
Dobot
- get_dobot_position():
- returns the current position of teh dobot in x, y and z coordinates
- get_suction_cup():
- returns the current value of the suction cup (ON or OFF)
- suction_cup_activate():
- activates the suction cup
- suction_cup_deactivate():
- deactivates the suction cup
- reset():
- resets the dobot, by returning to the home position and resting the coordinate system
- move_to(x,y,z):
- moves the dobot to the provided coordinates
- x, y and z must be integers
- to_dict():
- returns a dict with the current values of the CPS
Custom Environment
- get_temperature():
- returns the value of the temperature sensor
- get_humidity():
- returns the value of the humidity sensor
- get_light_sensor():
- returns the value of the light sensor
- get_rfid_sensor():
- returns the value of the rfid sensor
- get_button():
- returns the value of the button sensor
- get_lamp_green():
- returns the value of the green led
- get_lamp_red():
- returns the value of the red led
- get_servo():
- returns the value of the servo actuator
- send_lamp_green():
- turns the green led on
- send_lamp_red():
- turns the red led on
- send_servo(activate):
- sets the servo to the
activateordeactivateposition - the
activateparameter must be a boolean value
- sets the servo to the
- to_dict():
- returns a dict with the current values of the CPS
Configuration of CPS in ADOpy
The configuration of which CPS is done by providing the config/config.yml file in the project on Jupyter and entering the needed parameters. The file can contain multiple CPS definitions, following the structure:
<identifier-for-loading>:
  openhab_endpoint: "https://openhab.omilab.org/rest/items"
  openhab_item_name: "<name-in-openhab>"
<identifier-for-loading1>:
  openhab_endpoint: "https://openhab.omilab.org/rest/items"
  openhab_item_name: "<name-in-openhab2>"
<identifier-for-loading> is used to load the information in the python code, using the
from config import CONFIG

cps_config = CONFIG["<identifier-for-loading>"] # --> loads the parameter of the <identifier-for-loading> entry
<name-in-openhab> is the identifier of the CPS in OpenHAB. With this name the calls of the client will be assigned to a specific CPS. How you can find the name, is described in more detail in OpenHAB - Interact with CPS
OpenHAB - Interact with CPS over GUI
We use our own OpenHAB installation to control the CPS in the experiment environment.
You can access the OpenHAB instance via: openhab.omilab.org
The login information is provided during the lectures.
After you are login in you can access the available CPS by:
- Click
Settings - Click
Model - Expand the wanted groups and CPS
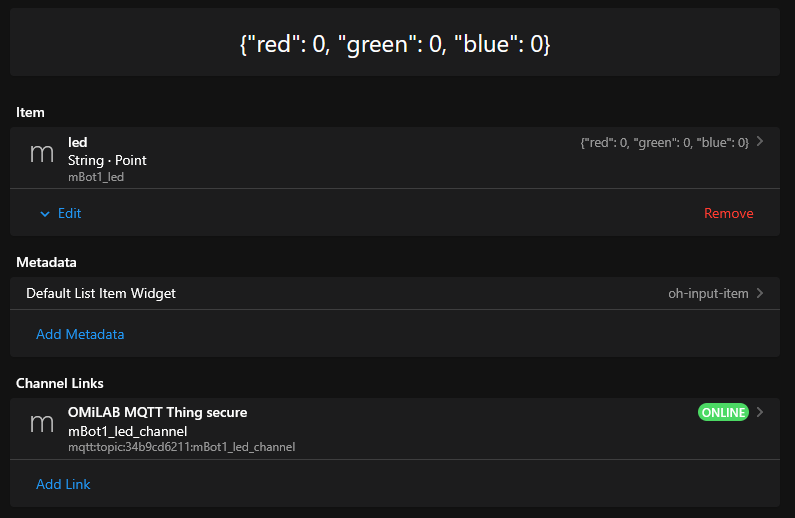
If you click on one of the CPS you see the name that is needed to be provided for the client code for ADOpy for Scene2Model (see Connecting to CPS). E.g., arduino1, dobot1 or mBot1.
OpenHAB can also be used to access test or view working of the CPS. The CPS can also be expanded to see their sensors, actuators and properties. The sensors and actuators must also be expanded. Below you can see example of an expanded CPS
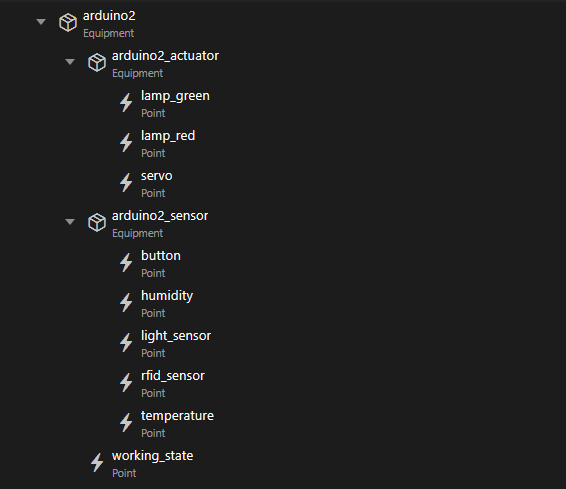 Example of a fully expanded CPS on OpenHAB
Clicking on the individual sensors, actuators or properties let you opens the item and let you see the current state. Based on the type it is also possible to send commands to the CPS from OpenHAB:
- For switches, one can just click on the graphical representation of the switch
- For text fields, one must:
- Open the item
- click
Default List Item Widget - fill in the information in the text field
- click the
tickto send
ATTENTION: Some CPS only react if the provided text is changing. If the same is send, no appreciable change in the physical object can be seen.
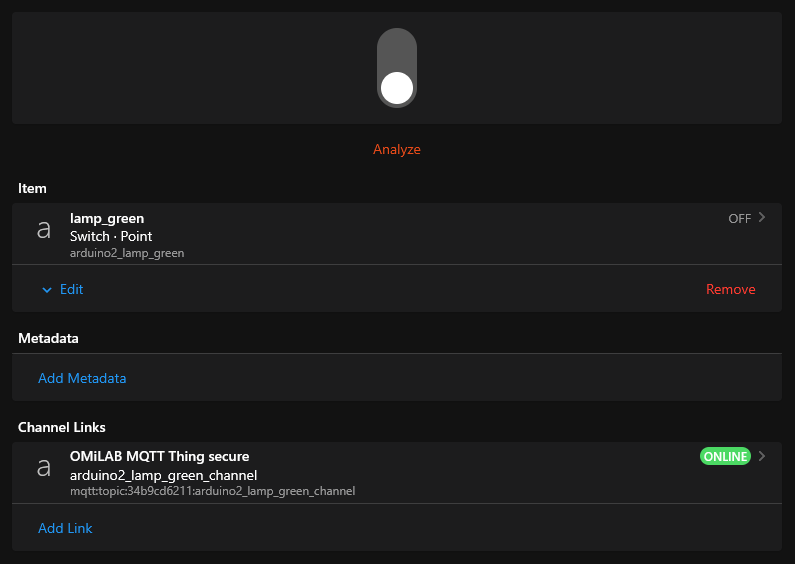 Example of a switch representation in OpenHAB
 Example of a text item
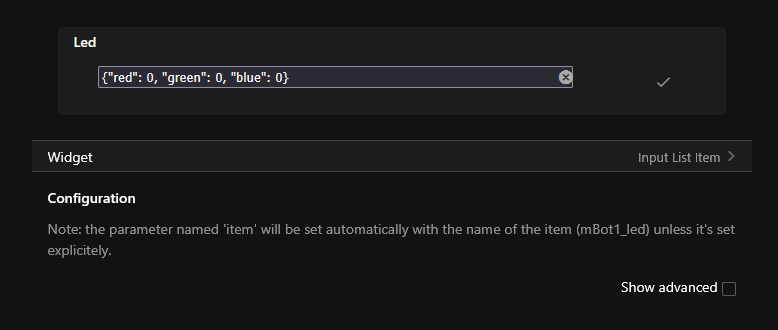 Example for an interface to send text to an actuator