Update your Domain-Specific Library
This chapter introduces how you can adapt an already created or imported Domain-Specific Library, which will be called libraries in this chapter.
Prerequisites:
- A Domain-Specific Library is already created or loaded.
Update Library Class List
The main window for updating a library is shown below and offers the following functionality. The picture and the short description just provides a short overview, how the different functions are used is described in the sections below. 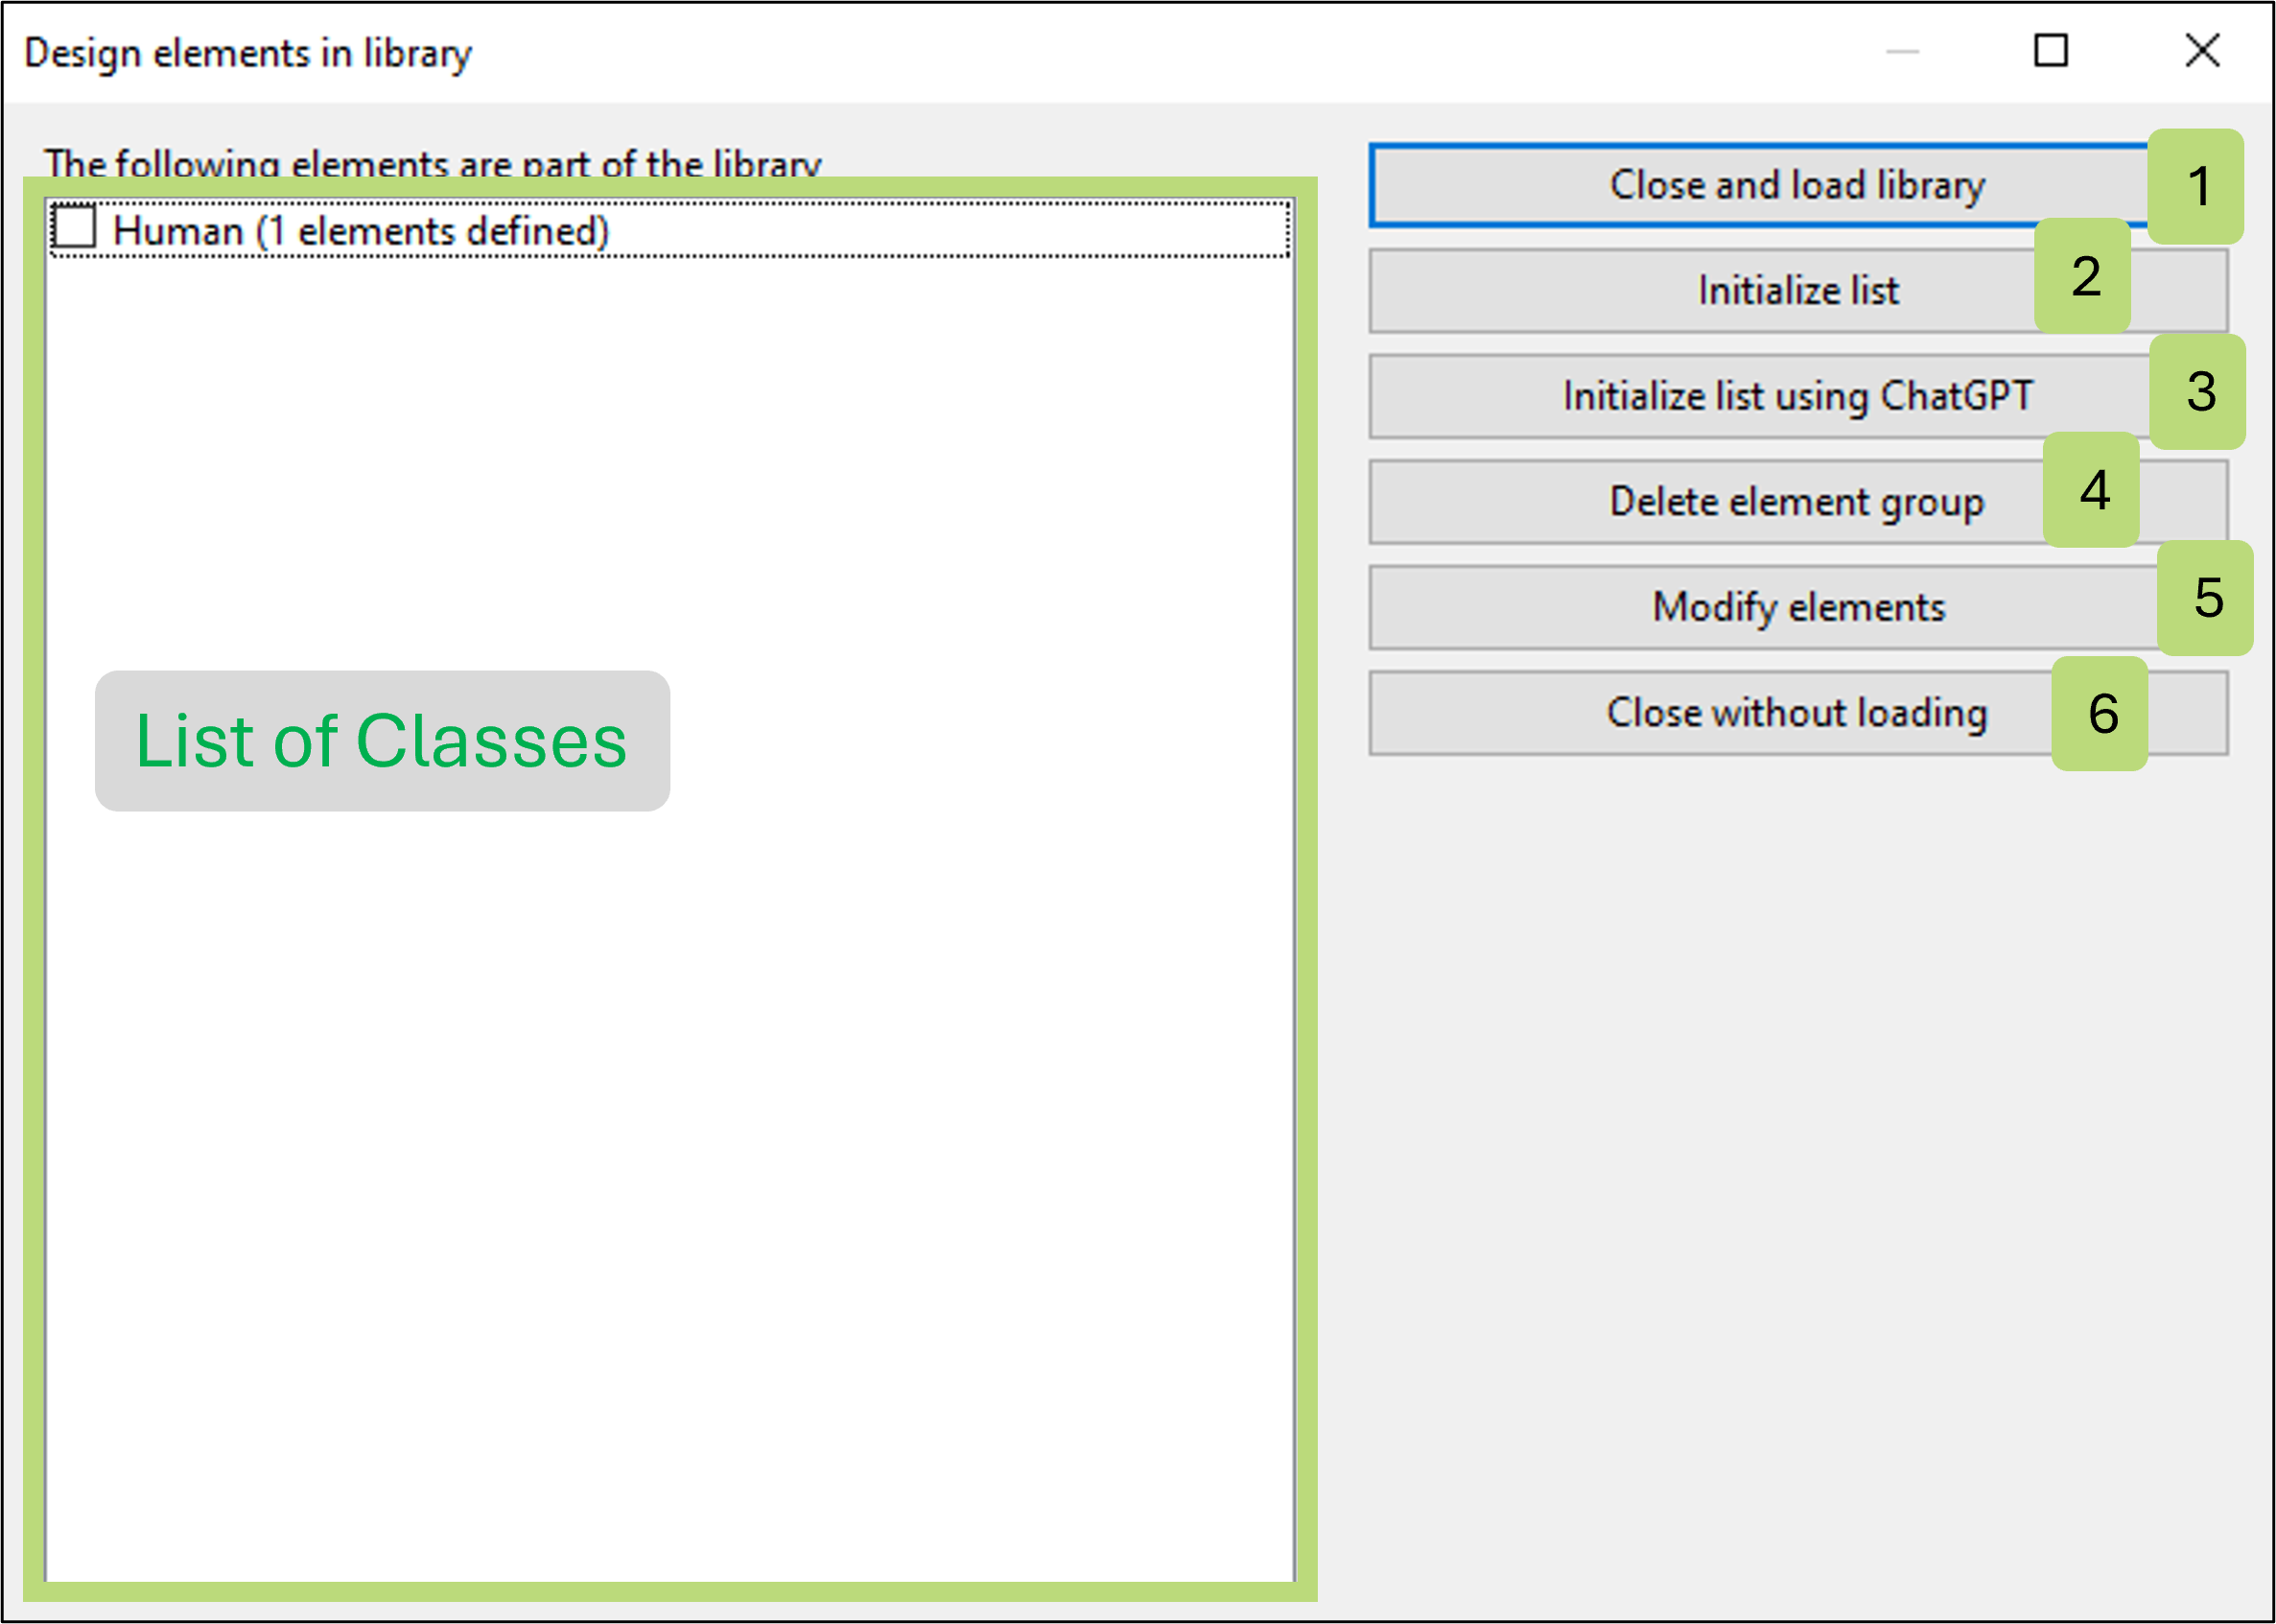
On the left side the list of available classes or elements is shown.
The buttons on the right offer the following functionality:
- Close and load library: Closes the update window and automatically load the changes in the Scene2Model tool
- Initialize List: Allows to create a list of classes, which are then created. In the list one class per line must be provided
- Initialize List using ChatGPT: Allows to provide a small description and ChatGPT then creates a list of classes
- Delete element group: Deletes the checked (with appeared tik) classes
- Modify elements: A class must be checked (with appeared tik) and then the window for modifying the types is opened.
- Close without loading: Closes the update window but does not load the changes into the library. The changes are already saved in the background.
Modify Classes
To modify the individual classes, the Modify elements window can be used, which is shown below. The picture and the short description just provides a short overview, how the different functions are used is described in the sections below. 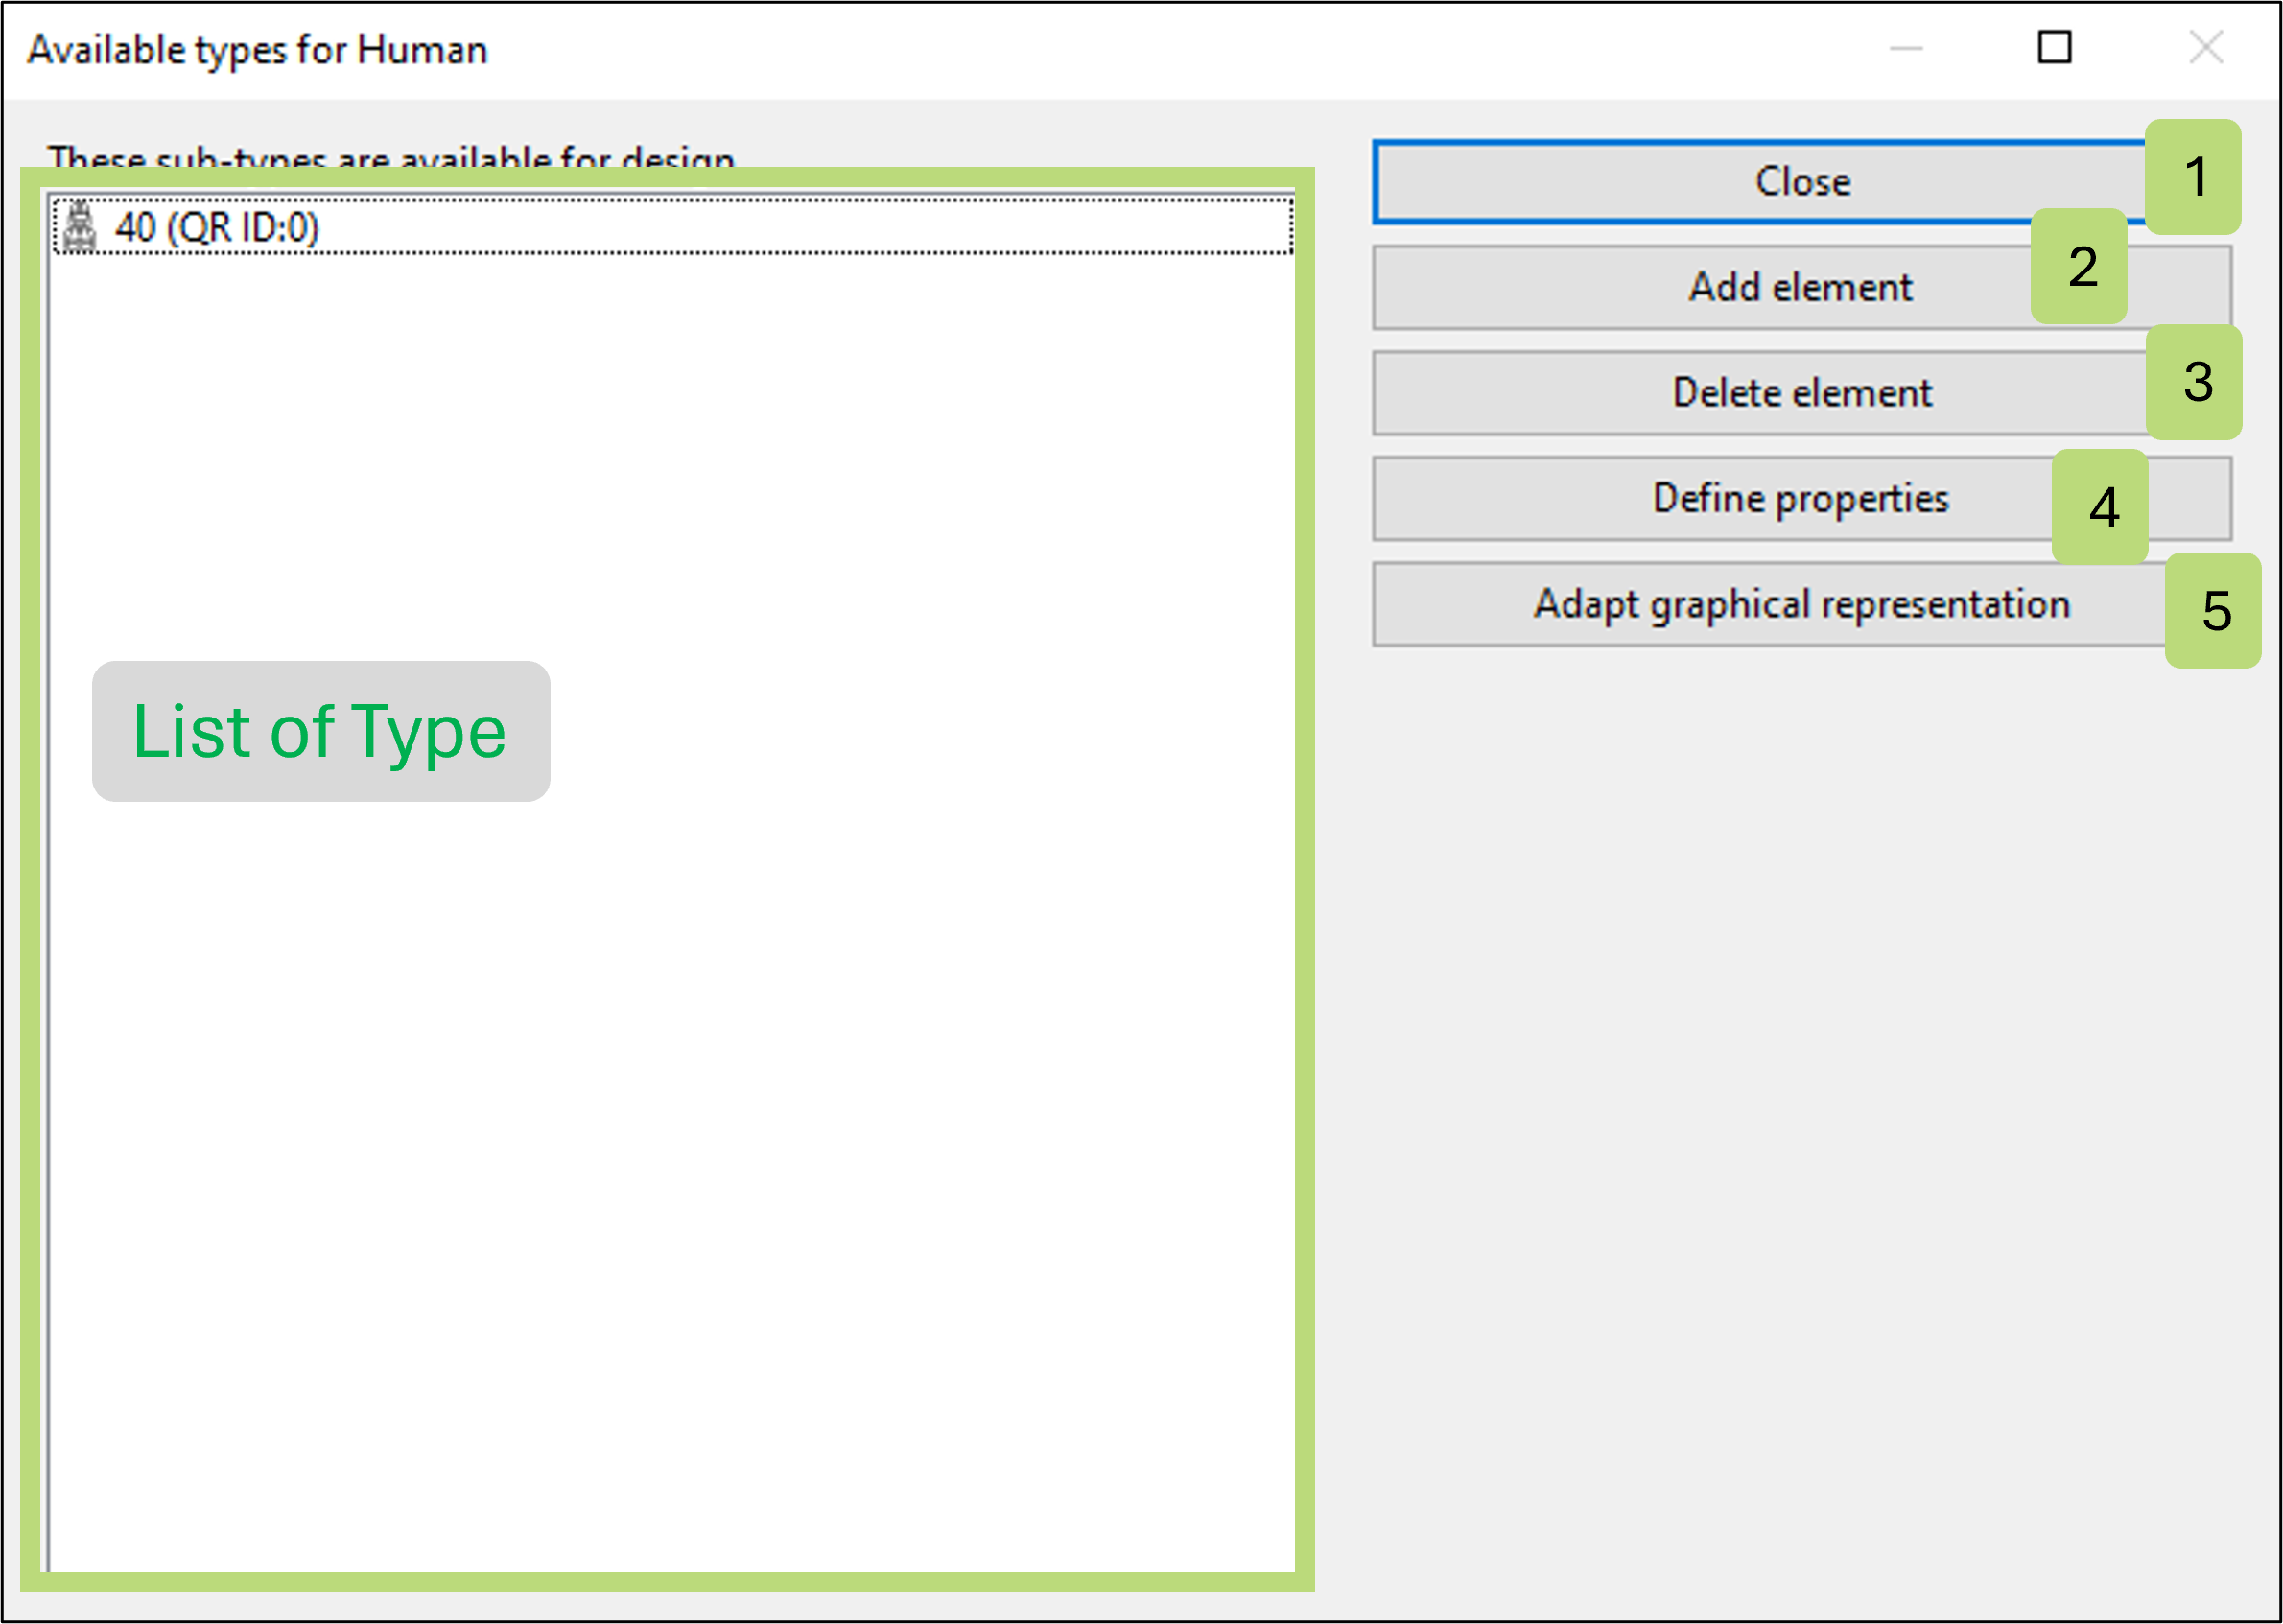
On the left side the list of available types can be seen.
The buttons on the right provide the following functionality:
- Close: Closes the window and returns to the library update window. Changes are automatically saved.
- Add element: Adds a new type/element to the class.
- Delete element: Deletes the marked types/elements of the class.
- Define properties: Allows to add attributes to the class, which can then be used over the notebook of a object in the modelling tool.
- Add graphical representation: Allows to add GraphRep code to the graphical representation of the class.
Reinitialize the Available Classes
The list of classes in the library can be new initialized, either manually or with AI-supported.
Attention: Initializing a new list of classes deletes the current one.
- Open the library update window
- Click
Library Management->Update current library
- Click
- Choose which variant of class list should be initialized
- see the create Domain-Specific Library documentation to get more information on the usage.
Delete Classes
This section introduces how classes or design elements can be deleted using the library update window.
- Open the library update window
- Click
Library Management->Update current library
- Click
- Delete classes
- Check the classes that should be deleted (the tik must appear)
- Click on
Delete element group - Confirm that the selected classes should be deleted, by clicking
Yes
Add a Type to a Class
This section introduces how a type can be added to a class. The type defines the graphical representation of a class, whereby one class can have multiple types.
- Open the library update window
- Click
Library Management->Update current library
- Click
- Define the types and visualisation of the design elements:
- Check the class for which types should be defined
- Click
Modify elements - Click
Add element - Search for the picture that should be used for the visualisation and confirm (as name for the type the name of the picture until the first full stop is taken)
- Confirm with
Close - Repeat for each class and add all the types that should be available
- Save the library
- You have to decided if the changes to the library should be loaded by choosing one of the two buttons:
- Load the library afterwards by click on
Close and load library - Otherwise click
Close without loading
- Load the library afterwards by click on
- You have to decided if the changes to the library should be loaded by choosing one of the two buttons:
Delete a Type of a Class
Through the library update functionality a type of a class can be deleted.
- Open the library update window
- Click
Library Management->Update current library
- Click
- Delete Type
- Check the class for which a type should be deleted (the tik must appear)
- Click
Modify elements - Mark the type that should be deleted
- Click
Delete Element - Confirm with
Close
- Save the library
- You have to decided if the changes to the library should be loaded by choosing one of the two buttons:
- Load the library afterwards by click on
Close and load library - Otherwise click
Close without loading
- Load the library afterwards by click on
- You have to decided if the changes to the library should be loaded by choosing one of the two buttons:
Modify Attributes and Graphical Representation
In this section we will describe how you can add attributes to classes and further influence the visual representation.
Prerequisites:
- Attributes: To add attributes to a class you should be able to read and write JSON.
- Graphical representation: The visual representation of domain elements is based pictures. Additionally, you can utilize the underlying ADOxx platform and add
GraphRepcode to the objects, which is also visualized. To do so you have to be able to writeGraphRep. More information on GraphRep can be found here. This section only shows how you can add GraphRep snippets but not how to write it and what it is.
Add Attributes to a Class
To add attributes the following 3 properties must be defined:
- name: Name of the attribute which is shown in the notebook and with which the attribute can be accessed
- type: Type of the attribute. The following types are supported: INTEGER, DOUBLE, STRING, LONGSTRING, DATE, DATETIME
- defaultValue: The value which is shown by default, after a new object of the class is created
Apply the following steps to adapt the attributes:
- Open the modification window of a class:
- Click
Library Management->Update current library - Check the class for which an attribute should be added (the tik must be set)
- Click
Modify elements
- Click
- Add a attribute
- Click on
Define properties - Add the JSON code to define the attributes based on the provided example
- Click
Applyto save
- Click on
- Saving the changes:
- Click
Close - Click
Close and load library
- Click
Modify Graphical Representation
- Open the modification window of a class:
- Click
Library Management->Update current library - Check the class for which an attribute should be added
- Click
Modify elements
- Click
- Modify Graphical Representation
- Click
Adapt graphical representation - Add the GraphRep code
- Click
Apply
- Click
- Saving the changes:
- Click
Close - Click
Close and load library
- Click
Add Text to the Graphical Representation
Sometimes it is useful to show text directly in the model, e.g., if the text for a speech bubble should be filled in and shown directly in a model. To achieve this first the class must be prepared to have a attribute which can hold the text. Then this attribute must be added to the graphical representation.
Prerequisites:
- An attribute holding the text, which should be shown must be added in to the class. How an attribute is described above in section Add Attributes to a Class. For the example below we will assume a string attribute called Text and a integer attribute called Font size is available. The second attribute will define the size of the text shown in the model.
- Knowledge about ADOxx's GraphRep is beneficial.
How To:
- Open the modification window of a class:
- Click
Library Management->Update current library - Check the class for which the graphical representation should be adapted
- Click
Modify elements
- Click
- Add text to the graphical representation
- Hint: For this step
GraphRepcode must be written. At the end of this section you will find a code snippet as starting point for this part. - Click
Adapt graphical representation (element group) - Add the
GraphRepcode - Click
Apply - Click
Close - Click
Close and load library - Confirm with
OK - Select the Design Thinking project that should be imported
- Click
Import - Confirm with
OK
- Hint: For this step
Code snippet for showing text directly in the model:
# retrieves the number saved in objects 'Font size' attribute
AVAL fontsize:"Font size"

# sets the graphical representation based on the provided '<type-name>'
IF (sType = "<type-name>") {

    # create a dashed frame for the text
    FILL style:null transparent
    PEN style:dash
    RECTANGLE x:(tabx0+0.2cm) y:(taby0+0.5cm) w:(tabw1-0.4cm) h:(tabh1-2cm)

    #print the text onto the visualisation of the model
    FONT h:(PT fontsize)
    ATTR "Text" x:(tabx0+0.3cm) y:(taby0+0.6cm) w:l:(tabw1-0.6cm) h:t:(tabh1-2cm)

}
To use this snippet the string <type-name> must be replaced with the type for which the text should be added.
The cm values in RECTANGLE and ATTR are used to position the textbox:
- x: Increasing it moves the whole textbox to the right and decreasing it moves it to the left.
- y: Increasing it moves the whole textbox down and deceasing it moves it up.
- w: Defines the width of the textbox.
- h: defines the height of the textbox.
Hint: It works best if the x, y, w and h are the same for RECTANGLE and ATTR.