Standalone Setting
In the Standalone Setting the Scene2Model Modelling Tool and the Image Provider are running on the users' device. Under Windows installation, the user can start the image provider directly from the modelling tool. For other variations the user must install and start the image provider separately.
In this setting, the Recognition Component runs on a reachable server. Therefore, the endpoint which is used for the recognition must be configured.
The figure below visualizes Standalone Setting's components and their relations.
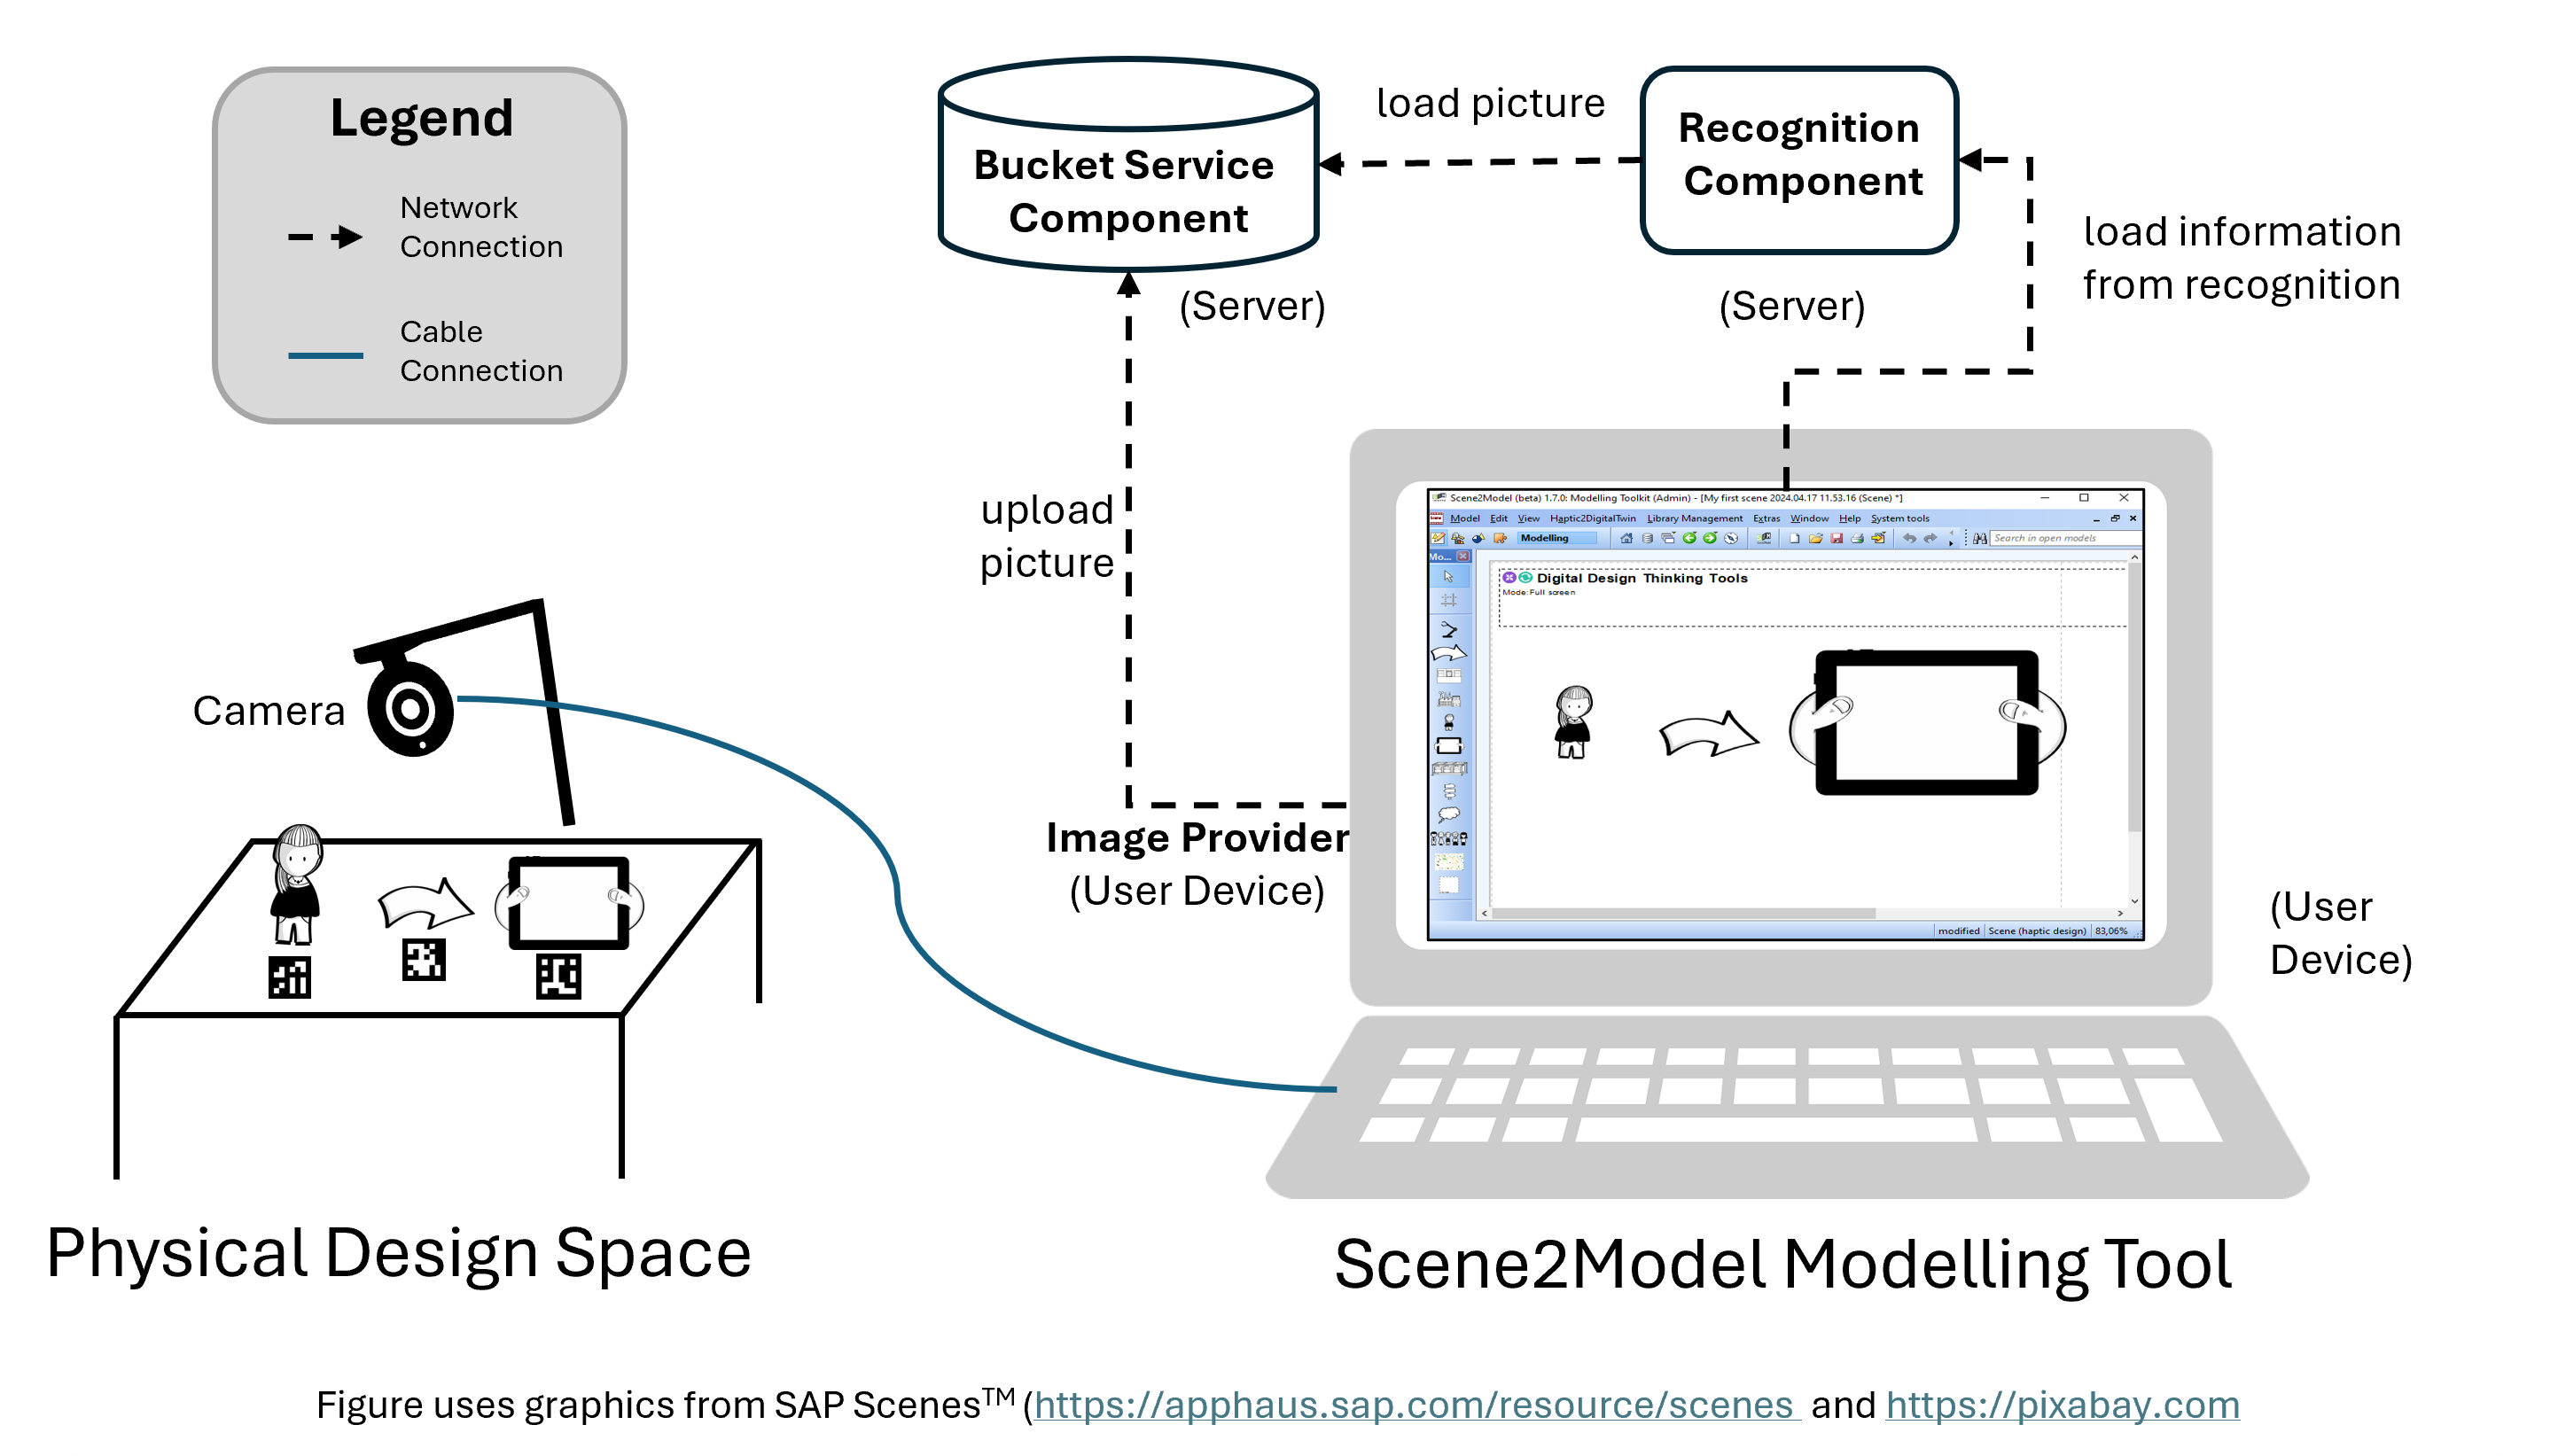
The Image Provider consists of two parts, which are implemented in one script, with different versions for Windows, MacOS and Linux:
- one takes a picture with a Logitech C920 camera
- and the second sends the taken picture to Bucket Service Component.
The uploaded pictures can then be accessed by other applications, like the Recognition Component. The script uses ffmpeg to take the picture and curl to send the picture. Any device running one of the operating systems Windows, MacOS or Linux can be used to take a picture and send it to the bucket. The scripted are tailored to only use the Logitech C920, but with knowledge in ffmpeg they can be extended to allow the usage of other cameras.
The Bucket Service Component and Recognition Component can run on one or multiple servers. It is important that the Recognition Component can reach the Bucket Service Component over the network over internet. The Scene2Model Modelling Tool must be able to reach the Recognition Component to load the needed information from there.
Therefore, the following connections must be enabled in the set-up:
- The Image Provider must be able to make HTTP calls to the Bucket Service Component.
- The Recognition Component must be able to make HTTP calls to the Bucket Service Component.
- The Scene2Model Modelling Tool must be able to make HTTP calls to the Recognition Component.
- The Recognition Component also offers a web interface, to help the users of the Scene2Model Modelling Tool. Therefore, a browser on the user device should also be able to open web pages of Recognition Component.
The description of this setting focuses on starting the picture stream of the Image Provider directly from the modelling tool, which is only possible from installation on Windows. If you want to install the picture stream locally on another operating system you can do this via our S2M Bucket Image Provider project. Information on installation and usage are contained in the project
Configuration: End Point of the Recognition Component
Before a haptic model can be imported into the Scene2Model Modelling Tool, it must be configured to the prepared components.
Hints:
- Provided URLs should not have a
/at the end. - The concrete endpoints must be adapted to the concrete installation of the setting.
- The lines in the configuration window, which start with
#are comments and ignored by the tool:
Configuration Parameters:
The following parameters regarding the recognition endpoint must be set:
- OliveEndpoint: URL of the Olive endpoint, over which the information for creating models can be gathered. It is the URL of the controller user interface, plus adding a /rest at the end.
- OliveMicroservice: One Olive instance offers multiple services. In this parameter the identifier of the service created for this instance must be provided.
- BucketAndRecognitionServiceEndpoint: URL of the Recognition Component must be provided
- BucketEndpoint: URL of the Bucket Service Component
- DefaultBucket: name of the bucket that should be used within the Bucket Service Component
- Camera: Name of the camera that should be used (at the moment only a Logitech C920 is supported, which has the name HD Pro Webcam C920)
- Scene2Model_Library_Directory: Path to the currently loaded Domain-specific library directory. This parameter is set automatically if a new library is loaded.
Template for configuration:
Scene2Model_Library_Directory=<path-to-domain-specific-library-directory>

OliveEndpoint=<olive-endpoint>
OliveMicroservice=<olive-microservice-identifier>

BucketAndRecognitionServiceEndpoint=<bucket-and-recognition-endpoint>
BucketEndpoint=<bucket-endpoint>
DefaultBucket=<default-bucket-name>

Camera=<camera-name>
Configuration of the Endpoints
Open configuration Window
- Click
System tools - Click
Edit internal configuration file - Mark
scene2model.properties - Click
OK
- Click
Change the needed parameters
Confirm by clicking
Apply
Local Image Provider
In the Standalone Usage Setting a USB camera is positioned above the paper figures in a bird's eye view. The camera is connected to the same device, which runs the Scene2Model modelling tool This is done so that the tags, attached to the figures can recognised. For this setting the top edge of the camera should be pointing in the same direction as the figures will face, once they are positioned. If the top edge of the camera is facing the wrong direction, the recognition still works, but figures in the modelling tool will be shown mirror-inverted.
ATTENTION: This functionality only works with a Logitech C920 camera, out of the box.

Local Image Provider on Windows
For windows a local image provide can be directly started from the modelling tool. To use it, first the connected camera with which the pictures should be taken must be configured. This was tested with the Logitech C920, whereby it is possible that other cameras also work if the support a resolution of 1920x1080, but changing the camera may impair the functionality.
You can find the name of the connected camera under Windows by open the Device Manager and open the Camera menu. Here all the cameras are listed with the name that should be entered in the configuration.
The description below assumes that you use the Logitech C920.
Configuration of the Camera
- Configure the camera in the Scene2Model modelling tool
- Click
System tools - Click
Edit internal configuration file - Click
scene2model.properties - Click
OK - Enter the Name of your camera next to the
Camera=- Camera=HD Pro Webcam C920
- Click
Apply
- Click
Start the Local Windows Image Provider
- Start the picture stream (this description is only for windows)
- Open the ´Scene2Model Wizard´
- Choose
Run local camera stream (Windows only with Logitech C920) - Click
Select - Check your picture identifier (and update if necessary)
- A terminal window is opened, showing information about the picture stream. This window should only be closed, once the picture stream is not needed anymore.
- (Optional) Check if the stream works, by clicking
Showing recognition results(Yellow button with sun)
Information: To adapt this setting to a new camera, knowledge in FFmpeg are needed. The script starting the local camera stream is located in the installation folder of the modelling tool, under s2m\bucket-image-provider\local-ffmpeg-win. If the runWebStream.bat script is adapted to a new camera, it can also be started with the new camera out of the modelling tool.
Local Image Provider on MacOS and Linux
On MacOS and Linux the image provide cannot be started directly from the Scene2Model tool. Information on the reason can be found below under Why can the image provider not be started from the Scene2Model tool from MacOs and Linux?. But this description focuses on how the Image Provider component can be manually started. Once started manually, the Scene2Model tool can be used exactly like started directly from the tool.
Prerequisites:
- The Scene2Model Bucket environment is prepared.
- ffmpeg (https://ffmpeg.org/) is already installed on your device.
- check if ffmpeg is installed on your device: Open a terminal and enter
ffmpeg -version.
- check if ffmpeg is installed on your device: Open a terminal and enter
- curl (https://curl.se/) is already installed on your device.
- check if curl is installed on your device: Open a terminal and enter
curl -V.
- check if curl is installed on your device: Open a terminal and enter
- Knowledge on how to work with the terminal on these operating systems.
If the prerequisites are not fulfilled, please install them following the instruction on the corresponding pages.
Preparation
Download
To start the Image Provider component, first the S2M Bucket Image Provider project must be downloaded.
The project can be downloaded using the following link: Download S2M Bucket Image Provider
Save and unzip the downloaded .zip file on your device where you can easily access and find it.
Provide Execution Rights
Open the folder for your operating system in a terminal. Add execution rights the .sh file, by running the following command:
chmod +x runWebCamStream.sh
Identify camera name
To start the Image Provider the camera identifier must be provided. You can access the identifier of the camera using the following commands.
Mac:
- Open a terminal
- Enter
ioreg | grep -i cam(with the Logitech C920 you can use HD Pro Webcam C920 as identifier)
Linux:
- Open a terminal
- Enter
v4l2-ctl --list-devices(if only the Logitech C920 is plugged in, you can use /dev/video0 as identifier)
Start the Image Provider
Use the following steps to start the Image Provider
- Open a terminal
- Navigate to the downloaded folder
- choose either local-ffmpeg-linux or local-ffmpeg-mac depending on your operating system.
- Enter
./runWebCamStream.sh Y "<camera-identifier>" "<link-to-bucket>" "<image-identifier>"
The following parameter are needed:
Y: needed parameter for confirming that the script should be executed.<camera-identifier>: identifier of the camera, as identified in the Preparation step.<link-to-bucket>: The link of the Bucket Service Component, that is prepared separately.<image-identifier>: The identifier of the picture, which is then used in the Scene2Model tool to import the digitalized paper figures. You can provide the name of an existing picture (without the .jpg at the end) or you can use""to generate a new, random name.
Afterwards the terminal regularly shows information that the picture was uploaded. Then the picture is available at bucket and can be used with the Recognition Component. If you want to end the picture stream, you can close the terminal as a whole or open it and press ctl-c (maybe multiple times until the terminal reacts).
Why can the image provider not be started from the Scene2Model tool from MacOS and Linux?
The reason why the Image Provider cannot be started directly from MacOS and Linux is, that on these operating systems the modelling tool is installed within a Wine environment, which by default cannot access cameras plugged into the device. If you configure your operating system so that Wine can access the plugged in camera, then it can be stared directly form the modelling tool.