OMiLAB Laboratory Setting
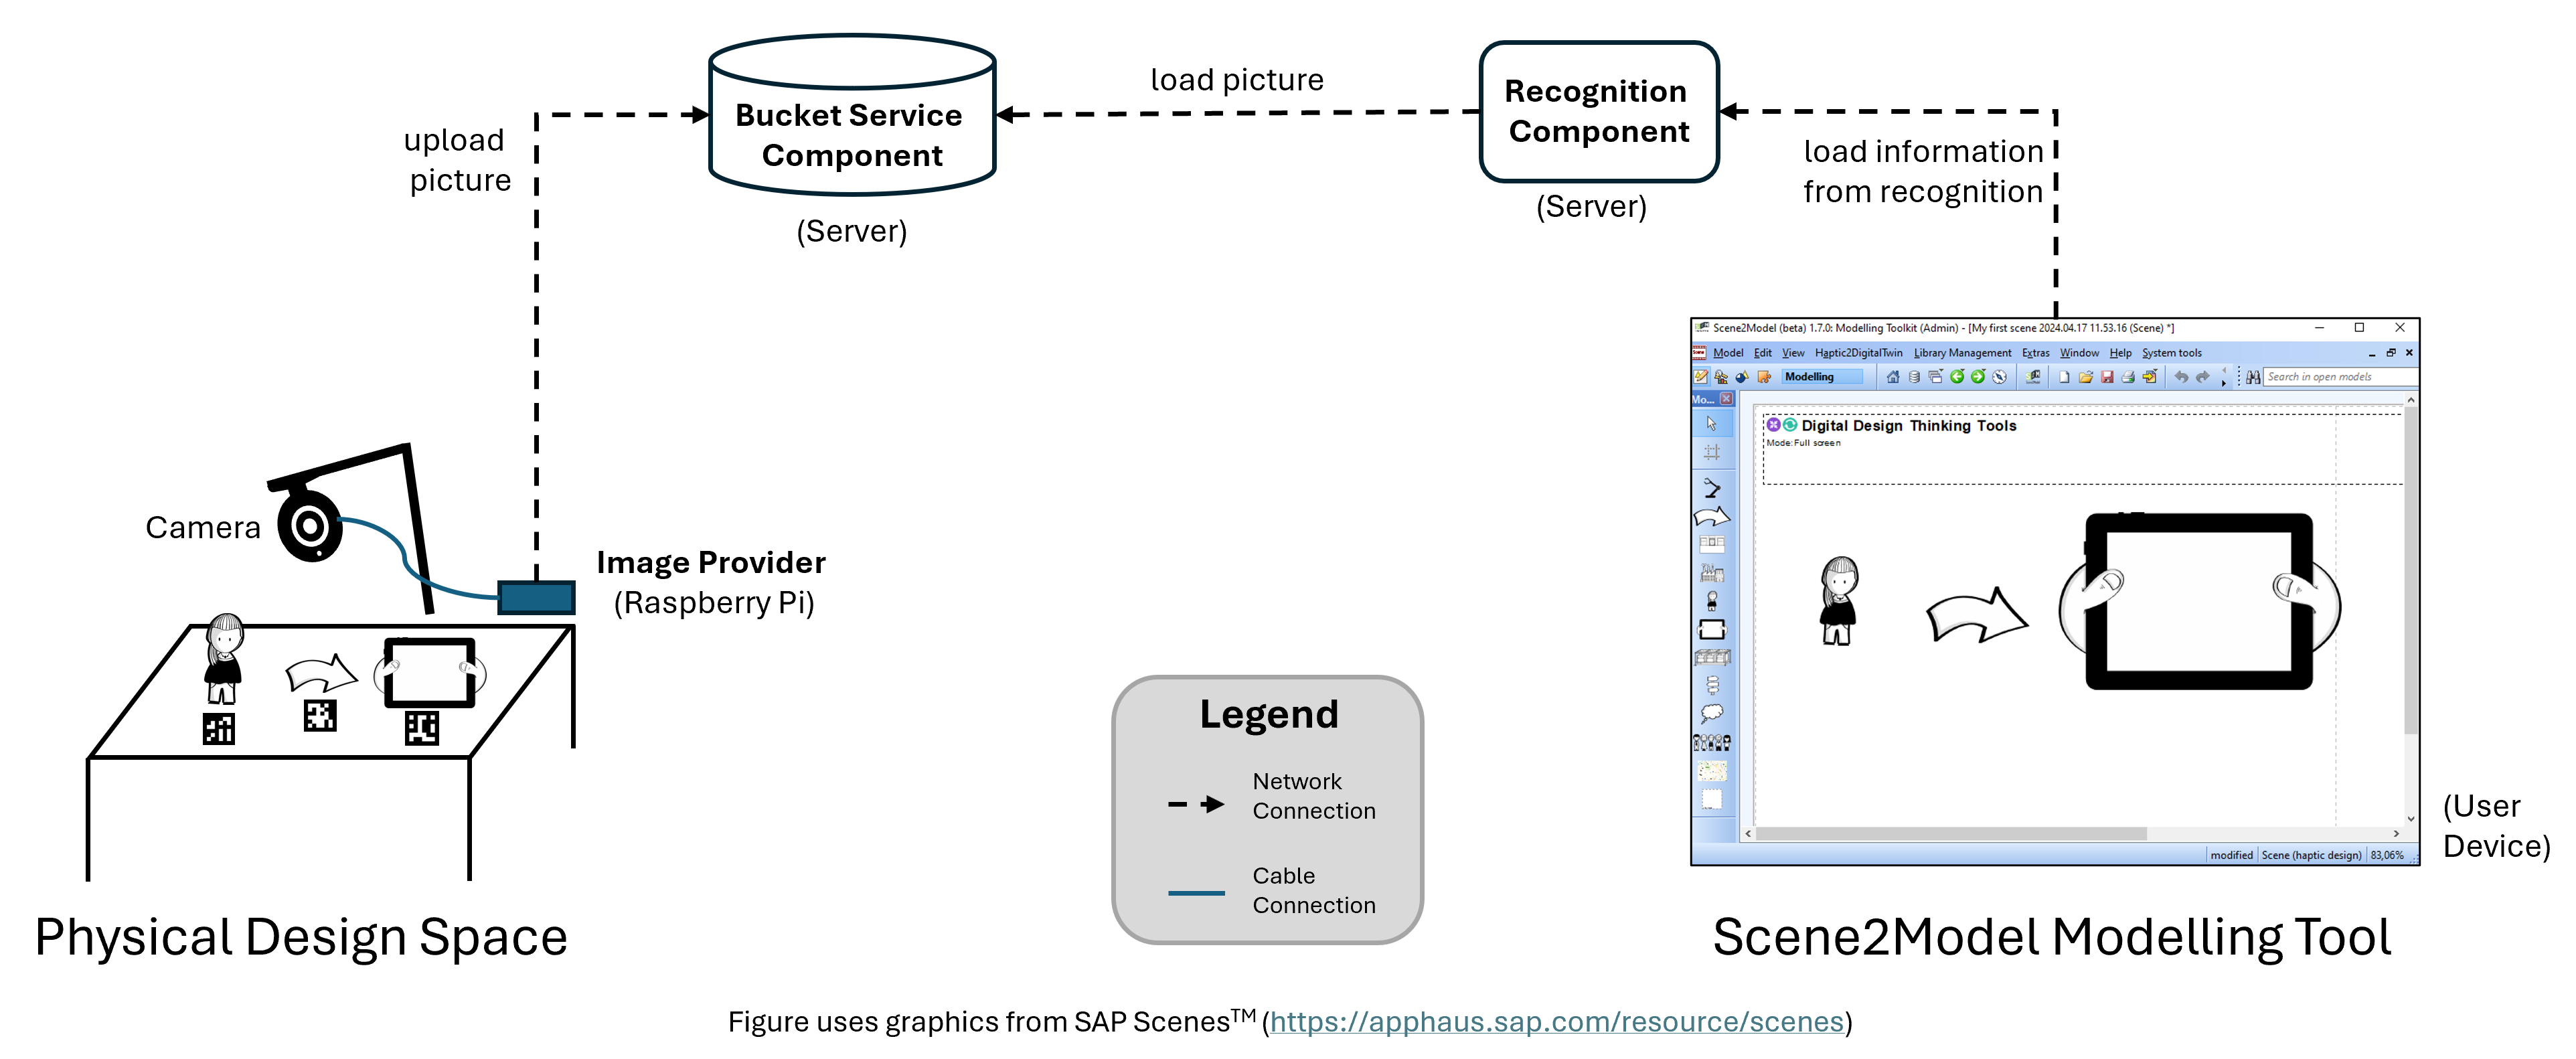
The Laboratory Setting contains a setup, where the Recognition Component and the Bucket Service Component run on reachable sever. The *Image Provider runs on a dedicated device (e.g., a Raspberry Pi), constantly streaming the picture to the Bucket Service Component. The Scene2Model Modelling Tool is then connected to the recognition component and collects the information needed to create the model, whereby the recognition components collects the picture from the bucket. This setting has a stationary nature and can be used to efficiently use Scene2Model in a dedicated place, like a OMiLAB Node laboratory.
To use the OMiLAB Laboratory Setting with the OMiLAB Digital Innovation Environment (DIEn), we provide an easy way to install it Image Provider (including the Camera Service Component and the Bucket Service Component) and the Recognition Component on a Raspberry Pi. More information on the DIEn can be found in the Digital Innovation Environment Brochure.
You can find the description, how you can set it up within an existing DIEn below in Setting Up the Laboratory Usage Setting in OMiLAB's Digital Innovation Environment.
This page describes the setting itself, how it can be used in the modelling tool to import haptic models can be found at Import Haptic Design. Or you can contact the OMiLAB Team to purchase your own OMiLAB DIEn, where every thing included and ready to use.
- Contact the OMiLAB Team: info@omilab.org
The figure below visualizes Laboratory Setting's components and their relations.
To use this setting, first the Physical Design Space must be set-up. An example, can be seen in the figure below. For the Laboratory Setting the USB camera is connected to a device and mounted to a camera arm, looking on the paper figures from above, so that the tags can be seen. The top-side of the camera must face in the same direction the paper figures are facing.

The Image Provider consists of two parts, a script that takes picture with a Logitech C920 camera and sends them to Bucket Service Component. From this other applications, like the Recognition Component, can access the picture. The script uses ffmpeg to take the picture and curl to send the picture. There exists scripts for Windows, Linux and Mac OS. Therefore, any device running one of these operating systems can be used to take a picture and send it to the bucket. The scripted are tailored to only use the Logitech C920, but with knowledge in ffmpeg they can be extended to allow the usage of other cameras.
The Bucket Service Component and Recognition Component can run on one or multiple servers. It is important that the Recognition Component can reach the Bucket Service Component over the network over internet. The Scene2Model Modelling Tool must be able to reach the Recognition Component to load the needed information from there.
Therefore, the following connections must be enabled in the set-up:
- The Image Provider must be able to make HTTP calls to the Bucket Service Component.
- The Recognition Component must be able to make HTTP calls to the Bucket Service Component.
- The Scene2Model Modelling Tool must be able to make HTTP calls to the Recognition Component.
- The Recognition Component also offers a web interface, to help the users of the Scene2Model Modelling Tool. Therefore, a browser on the user device should also be able to open web pages of Recognition Component.
You can find the scripts for the picture stream of the Image Provider at our S2M Bucket Image Provider project. How you can install and use it is described in the readme.md file of the project.
Configuration: End Point of the Recognition Component
Before a haptic model can be imported into the Scene2Model Modelling Tool, it must be configured to the prepared components.
Hints:
- Provided URLs should not have a
/at the end. - The concrete endpoints must be adapted to the concrete installation of the setting.
- The lines in the configuration window, which start with
#are comments and ignored by the tool:
Configuration Parameters:
The following parameters regarding the recognition endpoint must be set:
- OliveEndpoint: URL of the Olive endpoint, over which the information for creating models can be gathered. It is the URL of the controller user interface, plus adding a /rest at the end.
- OliveMicroservice: One Olive instance offers multiple services. In this parameter the identifier of the service created for this instance must be provided.
- BucketAndRecognitionServiceEndpoint: URL of the Recognition Component must be provided
- BucketEndpoint: URL of the Bucket Service Component
- DefaultBucket: name of the bucket that should be used within the Bucket Service Component
- Camera: Name of the camera that should be used (at the moment only a Logitech C920 is supported, which has the name HD Pro Webcam C920)
- Scene2Model_Library_Directory: Path to the currently loaded Domain-specific library directory. This parameter is set automatically if a new library is loaded.
Template for configuration:
Scene2Model_Library_Directory=<path-to-domain-specific-library-directory>

OliveEndpoint=<olive-endpoint>
OliveMicroservice=<olive-microservice-identifier>

BucketAndRecognitionServiceEndpoint=<bucket-and-recognition-endpoint>
BucketEndpoint=<bucket-endpoint>
DefaultBucket=<default-bucket-name>

Camera=<camera-name>
Configuration of the Endpoints
Open configuration Window
- Click
System tools - Click
Edit internal configuration file - Mark
scene2model.properties - Click
OK
- Click
Change the needed parameters
Confirm by clicking
Apply
Setting Up the Laboratory Usage Setting in OMiLAB's Digital Innovation Environment
This section explains how you can set up the Scene2Model Laboratory Setting within the OMiLAB Digital Innovation Environment (DIEn). This description contains how you can install the needed software on a Raspberry Pi and then use it within the DIEn.
Attention: In the default DIEn environment, only one Scene2Model Laboratory Setting is working. Therefore, if you have the old Scene2Model Raspberry Pi installed in your laboratory, you have to unplug it, before you can use the one created with this description.
Prerequisite
To install the the Scene2Model Laboratory Setting you must prepare the following hardware and Software.
Hardware:
- 1x Raspberry Pi 4 Model B (with case)
- 1x Raspberry Pi Power Supply
- 1x Micro SD Card - 32 GB (tested with Lexar micro and SanDisk Ultra)
- 1x Logitech C920
- 1x Camera arm for positioning the Logitech camera above the table
- 1x computer with a micro SD card slot (directly or over an adapter)
- 1x TL-WR802n with the OMiLAB DIEn configuration
Software:
- Raspberry Pi Imager: This is a software for installing the Raspberry Pi Image onto the Micro SD card.
- Download here
- Scene2Model Laboratory Setting Raspberry Pi Image: This is an Raspberry Pi Image with all the software for the Laboratory Setting pre-installed.
- Download here
- Scene2Model Modelling Tool: Modelling tool for creating the digital business models
- Download TBD
Network The network of the OMiLAB DIEn should be available so that the set-up Raspberry Pi can be connected to it. The network is called TP-Link_BC28. If this network is available the, Raspberry automatically connects to it with the following IP-Address:
- Raspberry Pi IP Address: 10.0.6.82
Set Up Procedure
Prepare the Hardware from the Prerequisite section
- Set up the camera arm
- Mount the camera on the camera arm
- Put the Raspberry Pi into the case
- Connect the camera to the Raspberry Pi
(a video showing how the Micro SD card, the camera and the power supply can be plugged in, is shown in step 4)
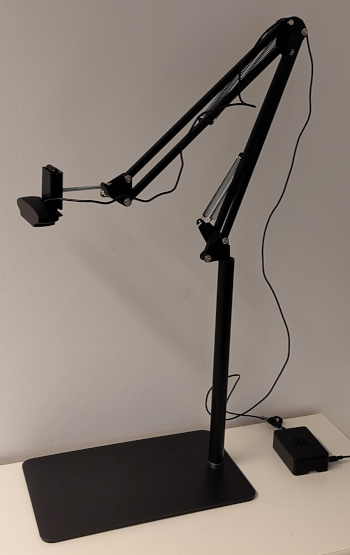 Picture showing the constructed arm, camera and Raspberry Pi
Download
- Download the Scene2Model Raspberry Pi Image (link in section Prerequisite)
- Download and install Raspberry Pi Imager (link in section Prerequisite)
- installation instructions available by the provided link
Upload the Raspberry Pi Image
- Insert the Micro SD card into your device
- Open Raspberry Pi Imager (confirm if you are asked, if Raspberry Pi Imager is allowed to make changes to your device)
- Click
CHOOSE Device - Choose
Raspberry Pi 4 - Click
CHOOSE OS - Scroll down and select
Use custom - Search and mark for the previous downloaded image (scene2model_bucket_shrunk.img.xz)
- Click
Open - Click
CHOOSE STORAGE - Choose your inserted Micro SD card
- Click
NEXT - Click
NOin the window asking if you want to apply OS customisation settings - Click
YESto delete everything from the Micro SD card and upload the provided software - Wait till the image is completely written and verified
- Remove the Micro SD card from your device
- Start the Raspberry Pi
- Insert the Micro SD card into your Raspberry Pi
- Make sure that the camera is plugged in into the Raspberry Pi
- Connect the Raspberry Pi to its power supply
* Mount the camera to the camera arm
* Make sure that the Raspberry Pi is near the *OMiLAB DIEn* wifi router
* Plug the power supply in the power socket
* Give the Raspberry Pi some time to boot
    * the blue led border of the camera should start to pulse
    * especially the first time this can take a longer time
- Configure the Scene2Model Tool
- Install the Scene2Model Modelling Tool (link in the Prerequisite section)
- (this documentation was tested with Scene2Model 1.7.1)
- Connect the device to the OMiLAB DIEn WiFi, which is called TP-Link_BC28
- Open the Scene2Model Modelling Tool
- Configure it like described in section Configuration of the Endpoints
- Use the properties provided below
- Attention: Just replace the parameters that are provided below. Do NOT change or delete the parameters Scene2Model_Library_Directory and Camera
- If you paste the parameters from below and they are not shown properly, apply the configuration and open it again. Now the configuration shown formatted correctly.
- Install the Scene2Model Modelling Tool (link in the Prerequisite section)
Configuration parameter for the Scene2Model Tool:
# -- system properties Scene2Model OMiLAB Digital Innovation Environment
OliveEndpoint=http://10.0.6.82:9903/micro-service-controller-rest/rest
OliveMicroservice=8efb08c6-9503-11ee-b9d1-0242ac120002

BucketAndRecognitionServiceEndpoint=http://10.0.6.82:9902
BucketEndpoint=http://10.0.6.82:9900
DefaultBucket=s2m
Test the Laboratory Setting
This subsection will shorty show how you can test, if everything is working properly, by importing the first paper figure into the Scene2Model Modelling Tool.
Prerequisite:
- Cut-out paper figures with attached tags are available
- A domain-specific Library is available in the Scene2Model Modelling Tool, as described in Domain-Specific Libraries
Hint: The default router from the OMiLAB Digital Innovation Environment does not have internet access. Some devices then automatically change to another available WiFi with internet. Make sure during testing, that you device stays connected to TP-Link_BC28.
- Position a figure with a tag under the camera
- Open the Scene2model tool
- Click
Scene2Model wizard - Choose
Quick scene in sandbox - Click
Update settings(violet button with gears)- Choose
Streamed image via bucket - Click
Select - Confirm the shown URL of the bucket service or enter a new one for your laboratory setting
- For this set-up the URL should be http://10.0.6.82:9902
- Click
Ok - Unfold the
s2mfolder by clicking on the plus, if it isn't already - Choose picture identifier used for your workshop
- A list with alle existing ones is shown, where you can use your existing one
- With Add you can add a new one, by providing the name
- The default name of the picture provided by the camera plugged into Raspberry Pi is called
lab_stream.jpg
- Choose
- Click on the
Run recognition(red button with camera)- The recognised paper figures should now be shown in the modelling tool