Nemo2024 Setting
The Nemo2024 Setting is a variant of the Laboratory Setting and was created to be used for the exercises of OMiLAB's Nemo Summer School 2024. It contains a setup, where the Recognition Component and the Bucket Service Component run on reachable sever. The *Image Provider runs on a Raspberry Pi connected to a locally set-up network. The image providers is constantly streaming the picture to the Bucket Service Component. The Scene2Model Modelling Tool is then connected to the recognition component and collects the information needed to create the model, whereby the recognition components collects the picture from the bucket. This setting has a stationary nature and can be used to efficiently use Scene2Model in a dedicated place. For this concrete setting, the Bucket Service Component and Scene2Model Modelling Tool are running on a server provided by the OMiLAB@UNIVIE Node.
This page describes the setting itself, how it can be used in the modelling tool to import haptic models can be found at Import Haptic Design.
Setting Overview
The components a typical set-up is visualized in the figure below.
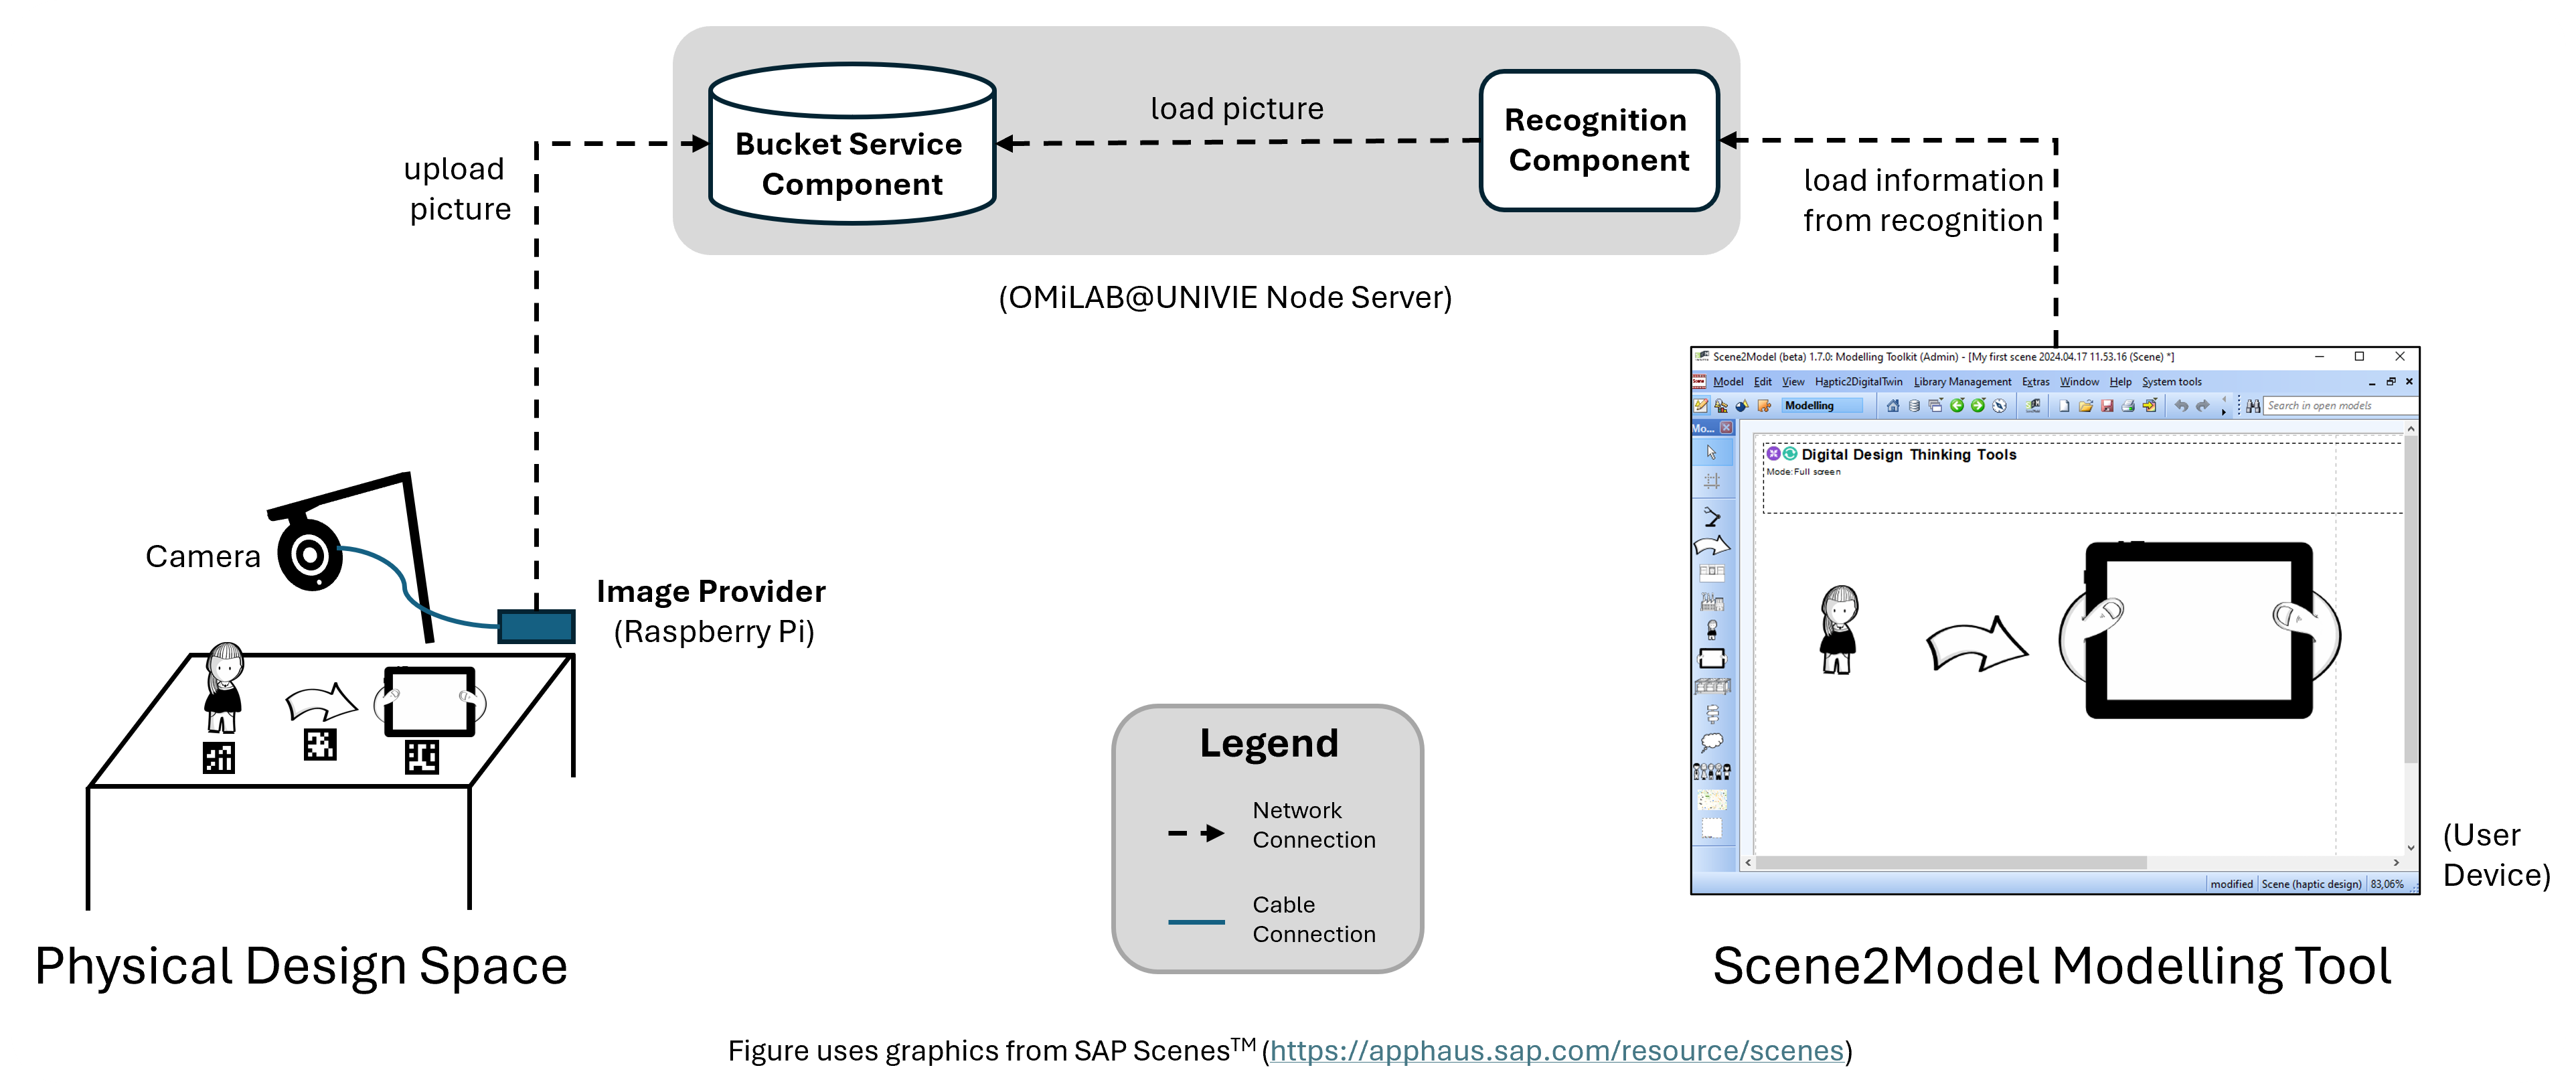
The Image Provider consists of two parts, a script that takes picture with a Logitech C920 camera and sends them to Bucket Service Component. From this other applications, like the Recognition Component, can access the picture. The script uses ffmpeg to take the picture and curl to send the picture. There exists scripts for Windows, Linux and Mac OS. Therefore, any device running one of these operating systems can be used to take a picture and send it to the bucket. The scripted are tailored to only use the Logitech C920, but with knowledge in ffmpeg they can be extended to allow the usage of other cameras.
The Bucket Service Component and Recognition Component can run on one or multiple servers. It is important that the Recognition Component can reach the Bucket Service Component over the network over internet. The Scene2Model Modelling Tool must be able to reach the Recognition Component to load the needed information from there.
Therefore, the following connections must be enabled in the set-up:
- The Image Provider must be able to make HTTP calls to the Bucket Service Component.
- The Recognition Component must be able to make HTTP calls to the Bucket Service Component.
- The Scene2Model Modelling Tool must be able to make HTTP calls to the Recognition Component.
- The Recognition Component also offers a web interface, to help the users of the Scene2Model Modelling Tool. Therefore, a browser on the user device should also be able to open web pages of Recognition Component.
You can find the scripts for the picture stream of the Image Provider at our S2M Bucket Image Provider project. How you can install and use it is described in the readme.md file of the project.
For the participants of the summer school, the organizer provided physical spaces with tables, where the participants can set up their Physical Design Space. Therefore, the camera must be attached to the table and set up, so that the it has a bird's eye view and the top corner of the camera faces in direction of the figures. This is visualized in the picture below.
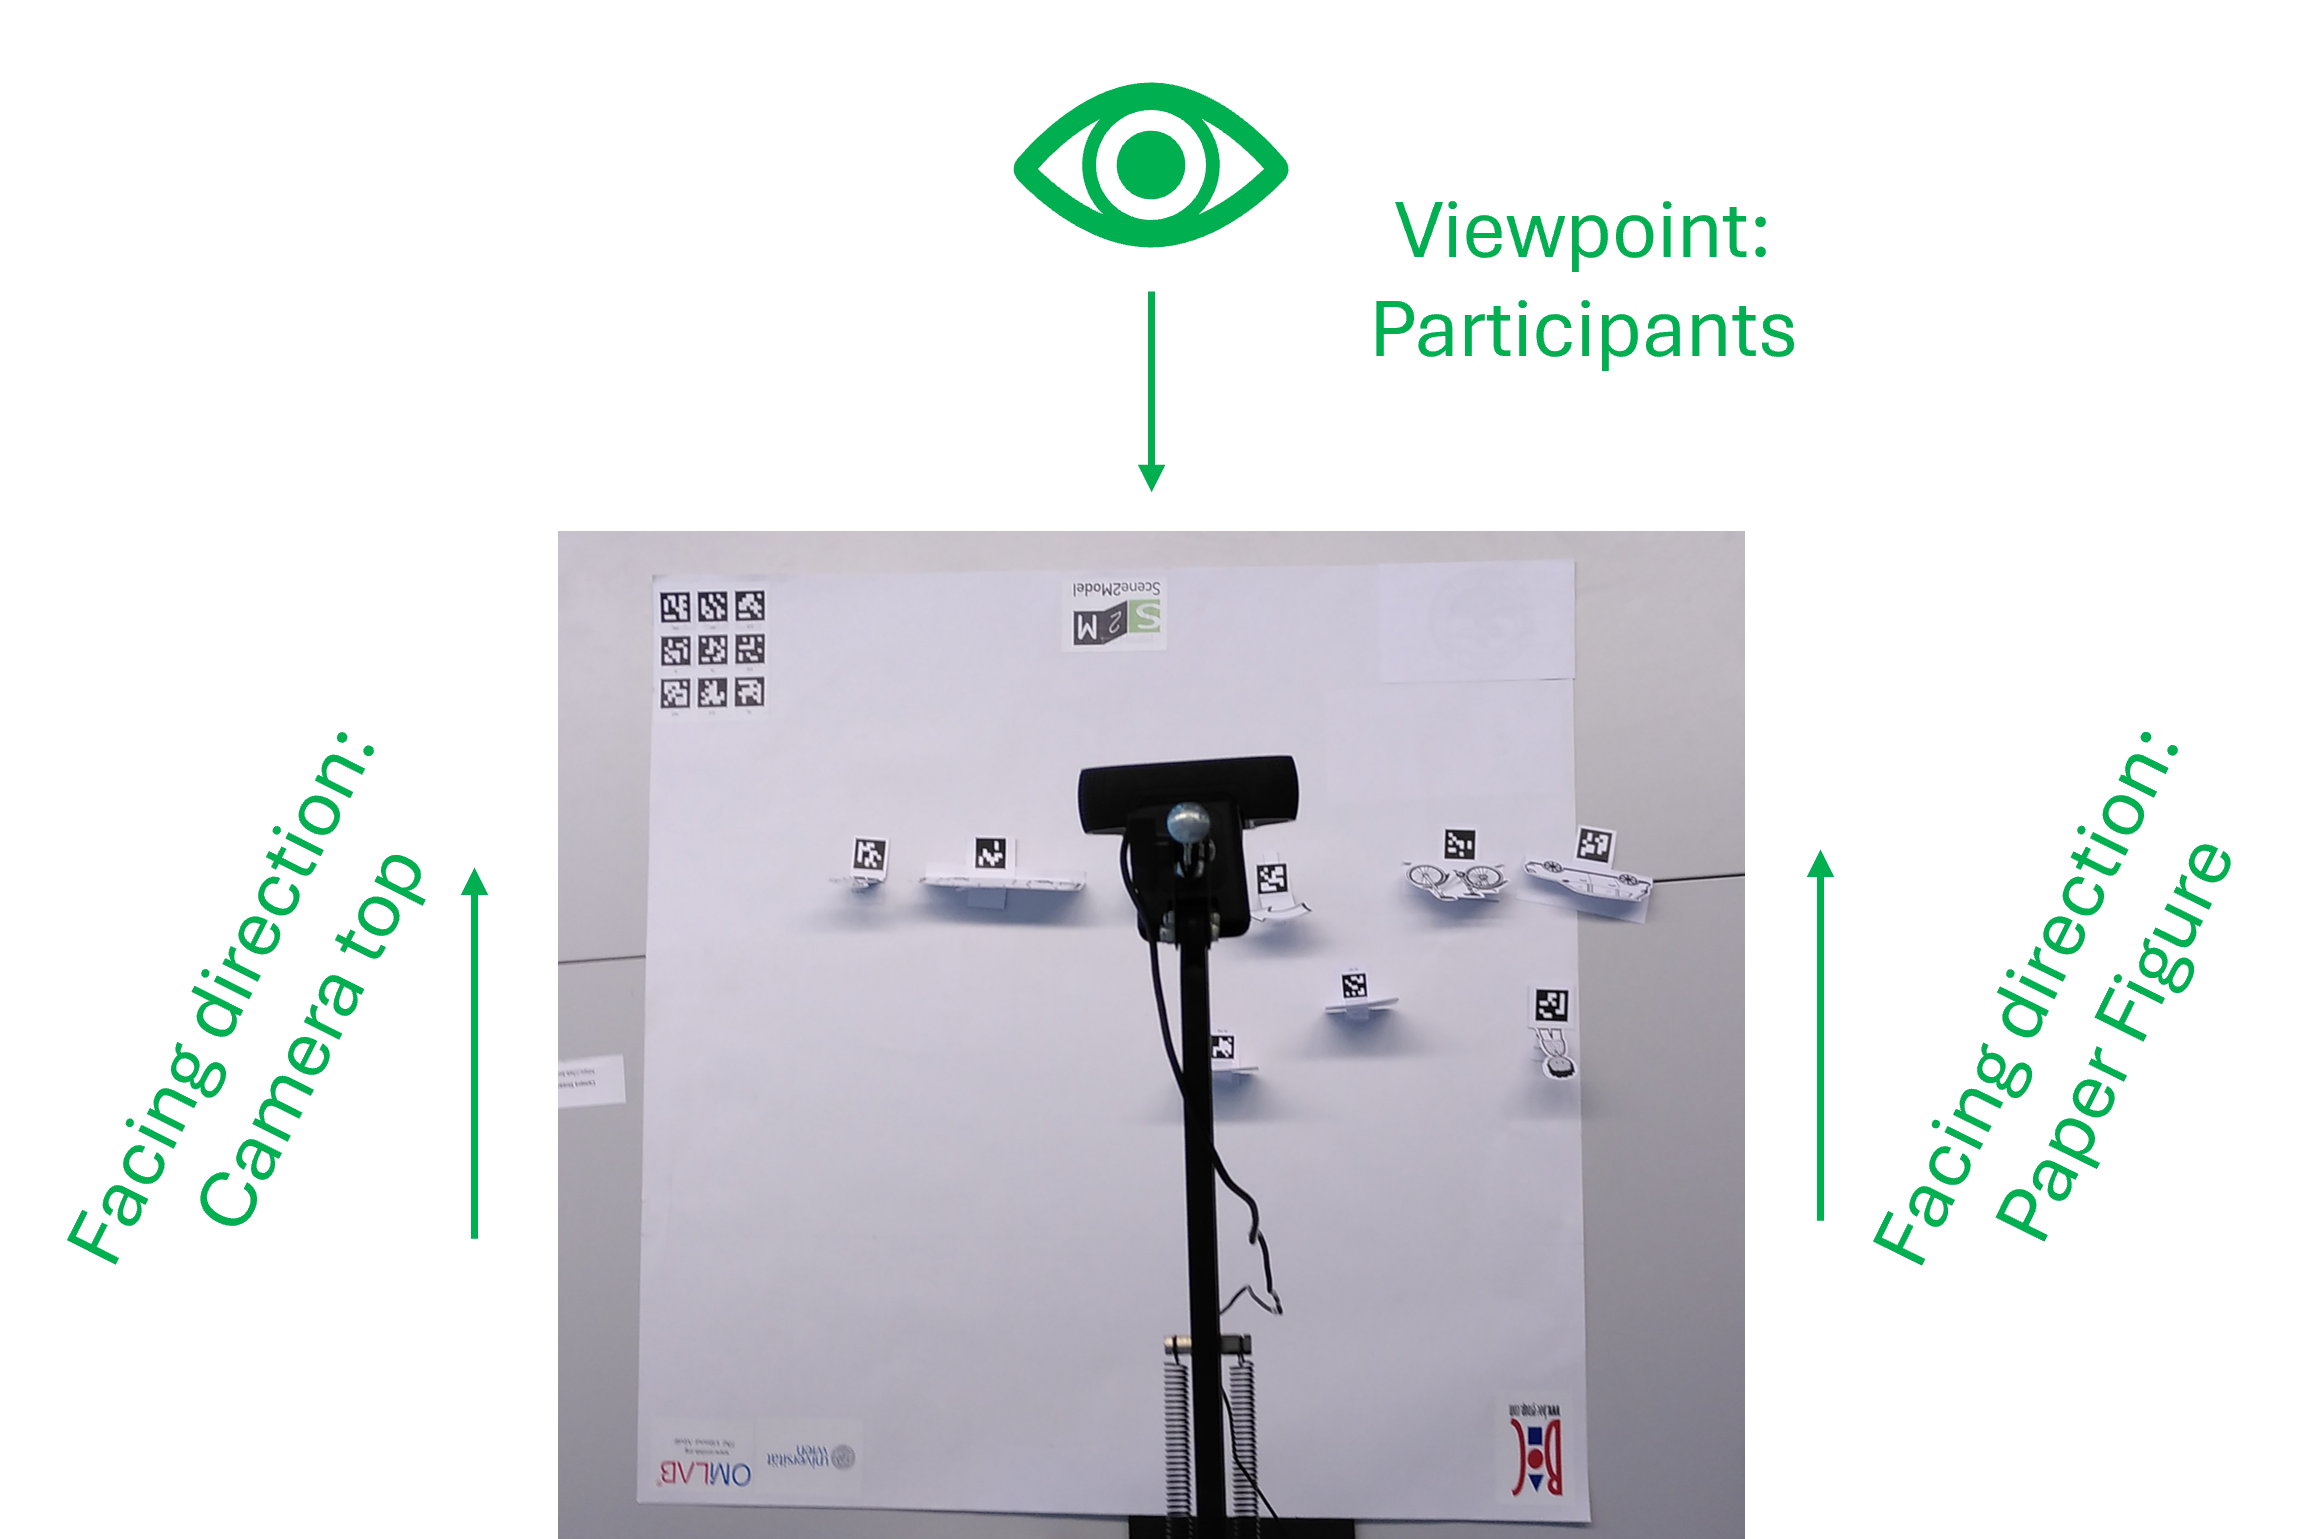
Then then camera needs to be plug-in in the provided Raspberry Pi, which connects to the provided W-Lan and starts the picture stream.
Additionally, the participants have to search for the paper figures, print them out and attach them to the provided tags. Afterwards, the modelling tool must be configured so it can be used with this setting.
Configuration: End Point of the Recognition Component
Before a haptic model can be imported into the Scene2Model Modelling Tool, it must be configured to the prepared components.
Hints:
- Provided URLs should not have a
/at the end. - The concrete endpoints must be adapted to the concrete installation of the setting.
- The lines in the configuration window, which start with
#are comments and ignored by the tool:
Configuration Parameters:
The following parameters regarding the recognition endpoint must be set:
- OliveEndpoint: URL of the Olive endpoint, over which the information for creating models can be gathered. It is the URL of the controller user interface, plus adding a /rest at the end.
- OliveMicroservice: One Olive instance offers multiple services. In this parameter the identifier of the service created for this instance must be provided.
- BucketAndRecognitionServiceEndpoint: URL of the Recognition Component must be provided
- BucketEndpoint: URL of the Bucket Service Component
- DefaultBucket: name of the bucket that should be used within the Bucket Service Component
- Camera: Name of the camera that should be used (at the moment only a Logitech C920 is supported, which has the name HD Pro Webcam C920)
- Scene2Model_Library_Directory: Path to the currently loaded Domain-specific library directory. This parameter is set automatically if a new library is loaded.
Template for configuration:
Scene2Model_Library_Directory=<path-to-domain-specific-library-directory>

OliveEndpoint=<olive-endpoint>
OliveMicroservice=<olive-microservice-identifier>

BucketAndRecognitionServiceEndpoint=<bucket-and-recognition-endpoint>
BucketEndpoint=<bucket-endpoint>
DefaultBucket=<default-bucket-name>

Camera=<camera-name>
Configuration of the Endpoints
Open configuration Window
- Click
System tools - Click
Edit internal configuration file - Mark
scene2model.properties - Click
OK
- Click
Change the needed parameters
Confirm by clicking
Apply